Downed CA!
First off I wanted to address that this wasn’t the intended post of today, this was suppose to be part 2 of the Global Protect post, which is the second dependency; Certificates. However I recently had to get a new cert at work, and discovered this same issue as I had deployed my CA following a decent blog tutorial online by StealthPuppy, and sure enough the same sight provides a follow up on how to fix a mistake made, we all make them and these are great opportunities to learn, so lets get learning!
So you might happen to open up the Certificate Authority Snap and point it to your CA server, to find this…. it’s shutdown….
 Fear not StealthPuppy has given us some helpful tips to resolve this!
The Issue
You might find your certificate authority, in this case, a subordinate certificate authority that is not started, perhaps after a server reboot. Attempting to start the CA, results in this message:
The revocation function was unable to check revocation because the revocation server was offline.
0x80092013 (-2146885613 CRYPT_E_REVOCATION_OFFLINE)
Which looks like this:

In the Application log on the subordinate CA, I can see event id 100 from source CertificationAuthority:
Active Directory Certificate Services did not start: Could not load or verify the current CA certificate. stealthpuppy Issuing CA The revocation function was unable to check revocation because the revocation server was offline. 0x80092013 (-2146885613 CRYPT_E_REVOCATION_OFFLINE).
As well as, event id 48 from the same source, CertificationAuthority:
Revocation status for a certificate in the chain for CA certificate 0 for stealthpuppy Issuing CA could not be verified because a server is currently unavailable. The revocation function was unable to check revocation because the revocation server was offline. 0x80092013 (-2146885613 CRYPT_E_REVOCATION_OFFLINE).
Certificate 0 is the subordinate CA’s certificate, issued by the offline Root CA.
I bypassed this portion of the blog as I didn’t want to have pictures of before the next required step soooo….
The Workaround
Of course, you probably want to get the CA up and running as quickly as possible. The easy way to do that is to disable CRL checking with the following command on the CA server:
Run this from an elevated command prompt and you should now be able to start the CA and get on with the business of troubleshooting.

Perfect, now lets fix this!
The Cause
My CRL was online as it is available in Active Directory (for domain joined machines) and via HTTP at subca.zewwy.ca, an alias of the subordinate CA. I’ve tested that I can retrieve the CRL by putting the HTTP path into a browser and I’m prompted to download a file.
Through having spent some time recently with setting up an Enterprise PKI in my lab and for a project, I’ve come to know the command line tool certutil.exe. This tool is available in all versions of Windows and should be the first tool to use to troubleshoot and manage certificates and certificate authorities on Windows.
Certutil can be used to perform many functions, one of which is to verify a CRL. I know the path to the CRL file because I can view the CRLs on the file system (in C:\Windows\System32\certsrv\CertEnroll) and I’ve previously configured CRLs for both CAs.
To verify the CRL, use the -URL switch with the HTTP (or LDAP) path to the CRL:
This will display the URL Retrieval Tool that shows that the CRLs are able to be contacted and show a status of OK.

*NOTE* I discovered this works directly on the Windows Core Server, if you happened to be running Core (I do as I love optimization, specially when you have to work in lab environments). Except as you might have noticed from the screenshot, the radio buttons are all messed (wonder what library handles that, that wasn’t in core…)
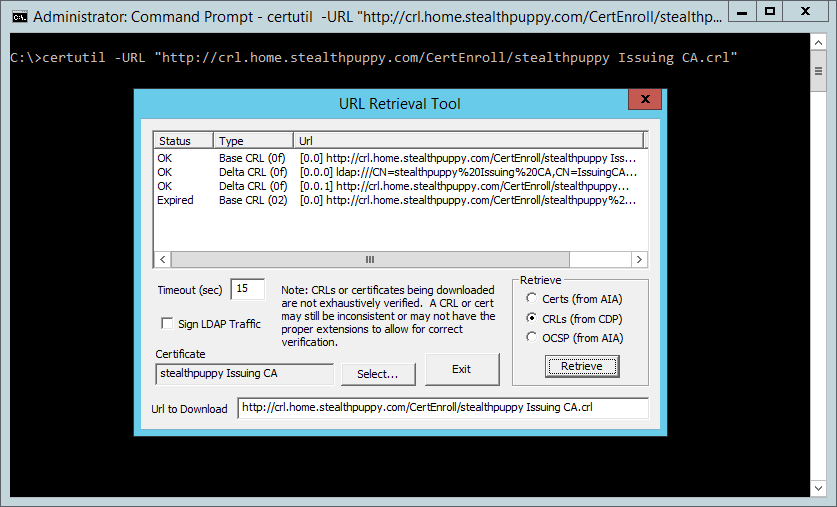
However, if we load a target certificate, in this case, the subordinate CA’s cert, we can start to see why we have an issue with the CRL.
Select the certificate for the subordinate CA that has been previously exported to the file system (in C:\Windows\System32\certsrv\CertEnroll) – click Select, open the certificate and click Retrieve again. This time, we can see a new line that shows that the base CRL for the subordinate CA’s certificate is Expired. (Unfortunetly I had to simply use his source images as in my case I had to also correct my CDP locations on my sign Sub CA Certificate as I had mentioned in my initial Setup Offline Root CA blog post, but I guess I didn’t do it in my lab, so I sort of had to fix to birds with one stone, the CPD locations in my cert by reissuing that, and the offline root ca CRL file, so my additional steps were a bit beyond these exact steps, I also didn’t take snapshots as I wanted to get back on pace with my blog post)
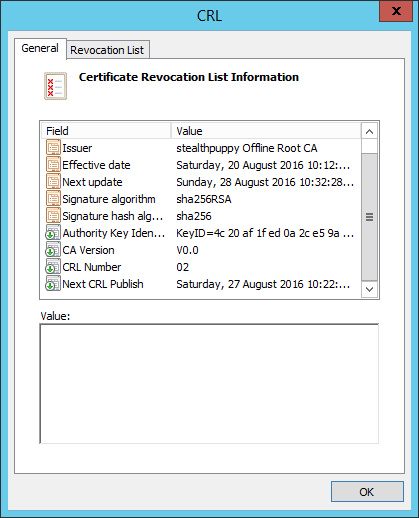
The CRL for the subordinate CA’s certificate will come from the root CA, so we’ll need to check that CRL. Open the CRL file (C:\windows\system32\certsrv\CertEnroll\stealthpuppy Offline Root CA.crl) – double-click or right-click and Open. Here we can see the CRL information, including the next publishing time (Next CRL Publish).
At the time of troubleshooting, this date was in the past and because the Root CA is offline and the CRL is hosted on a different server (the subordinate CA), this particular CRL will never receive an update. So, when the subordinate CA has rebooted, it has checked the Root CA’s CRL and found it expired. Hence the certification authority service won’t start.
How To Fix It
Now we know why the certification authority service won’t start and an understanding of why the CRL is offline, even if the wording doesn’t match the symptoms. If the error message had told me the CRL had expired instead of being offline, I might have saved some troubleshooting time. We now know that we need to re-publish the CRL from the Root CA.
Start the offline Root CA, log into it and open the Certification Authority console. We will first want to ensure that the CRL publication interval is extended so that we don’t run into the same problem in the near future. Open the properties of the Revoked Certificates node to view and set the publication interval. The default interval is 1 week, obviously too often for an offline Root CA.
Instead, set this value to something suitable for the environment you have installed the CA into. Remember that you’ll need to boot the Root CA and publish a new CRL before the end of this interval, otherwise, you’ll have exactly the same issue.
Now publish a new CRL – right-click the Revoked Certificates node and click All Tasks /Publish.
Copy the updated CRL (from C:\Windows\System32\certsrv\CertEnroll by default) from the Root CA to the CRL distribution point and overwrite the existing CRL file (C:\Windows\System32\certsrv\CertEnroll again on my subordinate CA).
Now if we again use certutil.exe to verify the CRL, it comes up roses:
To ensure that the subordinate CA’s certification authority service will start, re-enable CRL checking:
If you have re-published the CRL from the Root CA correctly, the service should start and you can then shut down the Root CA. Then open Outlook and put a reminder in the calendar for a week before the CRL expires again.
Conclusion
I’ve had this issue with an Offline CRL a few times now and not really understood what the issue is until I took the time to troubleshoot the issue properly. I don’t spend that much time with an enterprise PKI and it’s easy to underestimate the complexity of setting up AD Certificate Services correctly.
