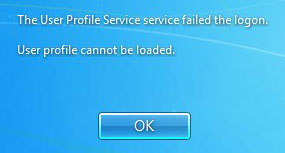
The User Profile Service failed the logon

It’s a beautiful Monday morning. I get up shower and get dressed for work. Hop on the bus, that happens to be crowded to the tits! As I stand silently enjoying the sun shine through the bus windows, I hear the annoying sounds of a child’s educational video game. Have you ever heard the sound FX from those things…. so repetitive it’ll drive you crazy!

I silently tough out my nightmarish bus ride, and walk into work. Pull up on my new standing desk, and begin to check on Backup status, and server updates. Then go to grab a coffee from the lunch room.

As I return to my office, I notice a Lync/Skype for Business communication from a colleague that works on another floor stating another user there can’t log into their system.

I quickly open cmd prompt to verify the workstation has network connectivity, it sure does. I remote in using our remote software, and watch the users login attempt, sure enough it fails.

The User Profile Service failed the logon

As this was something I had not seen before, although I had a real good assumption it was user profile based, I quickly googled the error as seen on the screen. Where would we be without google!? My first investigation brought me to this MS support page but it’s offered suggestions were a bit outlandish for me, considering it basically wanted me to manually re-create the profile and migrate the data. I don’t think so, as I went to go see how large the profile was via Advanced System Settings, I noticed the profile status was set to “backup”. Googling this issue brought me to this awesome blog page.

 To Paraphrase to solution:
	1) Open Regedit (�HKEY_LOCAL_MACHINE\SOFTWARE\Microsoft\Windows NT\CurrentVersion\ProfileList)
	2) Find the profile SID with the .bak
	3) Rename SID profile (with ProfileImagePath = c:\users\temp) to ***.ba
	4) Rename SID profile with .bak by removing the .bak
	5) Set DWROD State and RefCount to 0
	6) Rename or delete (haven't tested) ***.ba to ***.bak
	7) Reboot and enjoy

Jan 2018 Update

Sourced links, paraphrased solutions in case links die, good story and to the point. Well done.

Dangers of Xopy and Robocopy

I use my own blog once in a while to remind myself how to do a specific task, and sometimes I forget to document every step along the way.
I did my basic steps of using psexec with admin creds and elevated permissions, and came across the two useual problems I forgot to mention in my previous posts!

The first one being; Access Denied – unable to create directory.
That’s funny considering I have full admin permissions, this is another one of those erroneous error messages. This one was really due to junctions aka linked files in linux.
After hurdling that issue using the switches /d /s /y /h /i /z I discovered the next erroneous error message of insufficient memory. Gosh Darn it xcopy can you do anything right? Like usual google to the rescue and you sure enough discover that this event happens due the limit of 256 characters on the NTFS file format most windows use (unless you are on Win 8.1 or above and use the new file table, but that’s a blog post for another day.) So the total directory path turns out to be longer than NTFS allows and cause this “insufficient memory” error. As you can imagine google and others blogs have pointed me to Robocopy!.

Robocopy what a nice command tool! Anyway at first I attempt normal robocopy without switchs, well that didn’t work, then I saw the /MIR, MASSIVE CAUTION!
Robocopy by default attempts to copy junction links, and by doing so (I’m not sure exactly how it attempts to accomplish this) it will spiral into the junction creating folder parents of children deeply into itself leaving with a structer similar to:
c:\user\username\Application Data\Application Data\Application Data”
to the point where it gets so deep it managed to crash saying it can’t read the file and attempting to break out of it using ctrl+c, won’t really work.
If you did run Robocopy with the /MIR on a users profile or any parent directory with junction folders, you’ll have to manually clean up the mess left behind. When you attempt to deleted the parent folder it will prompt an error stating the file is too large for the file system it resides on or something similar. These events are full of erroneous error messages. But go as far into the folder as you can then cut the folder where you end and paste it all the way into its parent folder shrinking the complete path name allowing you to work with the deeper child directories, after a couple cut n paste it should be short enough for you to delete the folders and all files.
The proper way is to use “Robocopy /MIR /XJ SourceDir TargetDir”. This way junctions will be skipped. Hope this helps someone else experiencing troubles with Xcopy and Robocopy.

Jan 2018 Update

I remember this. 🙂 2014 was a good year.

Locked out of iLO, on ESXi hosts!

Scenario: You’ve taken over a system admin position, with little documentation and you are locked out of a pre-configured iLO port and the default username and password has been changed!

Prerequisites:
iLO Resources

iLO drivers and tools for server

Info Source

software install ESX host SSH

Let’s say you have a handful of ESXi hypervisors. Sweet, but what are they running on? A couple of G7 servers… They may not be G8’s but hey, can’t have everything.
Sweet part is most of these big servers have remote management capabilities. HP offers iLO, this sweet little separate attached hardware can do many remote tasks, such as, but not limited to: hard resets/power cycle, send SNMP Traps, and a couple of other things.
Now you’ve found the iLO host name, you send and receive ICMP requests (Pings) and sure enough you can access the web interface; fantastic!

Now you attempt to log on and realize every attempt fails. A couple question might start to arise, does this accept domain credentials (directory based authentication)? Is there a default User name and password?
Which of course by reading the user guide you discover it does, with one exception… Directory-based authentication requires an iLO license…
Now unless you’re in a big corporate environment running a decent sized datacenter chances are you don’t have directory based access on your iLO port.

Now you take the default admin account; Administrator, and type in the password as indicated on the info tab on the server… no luck…
as the guide suggests it has been changed… now comes all the fun stuff.. Bringing iLO up to date..

Now if you’re lucky the iLO drivers and tools for the ESXi host is already installed in which case you won’t even need to reboot your hypervisor to get into iLO.
However, if you don’t, make sure you migrate any active production VM’s to another host, or schedule a maintenance window.
At this point I’m assuming you have access to the host directly, admin access if not by directory services then a local root account.
SSH into the host directly, if you have /opt/hp/tools directory chances are you have the required iLO drivers and tools.

Otherwise ensure you follow these steps:
1) Log into vCenter (If managing a Cluster) and migrate/shutdown active VM’s.
2) Right click the host about to get iLO drivers installed on, Maintenance mode.
3) SCP hp-HPUtil-esxi5.0-bundle-1.4-15.zip to /tmp (to host)
4) In the SSH session (as admin/root) enter |esxcli software vib install -d “/tmp/hp-HPUtil-esxi5.0-bundle-1.4-15.zip”|
5) Let the server reboot
6) Wait for ICMP response, after a couple min of response you can take out of Maintenance Mode in vCenter

Congrats you can now manage the iLO port without needing to reboot the server ever again! Let’s get into that web interface!

You have a couple options at this point, reset the settings to factory defaults, or reset the admin password. Since we don’t have to reconfigure everything let’s reset that password.
There’s a good chance the previous admin changed the name and password or the default admin so how do we figure what that account is?
All one has to do is export the existing configuration and display it.
On the SSH session on the ESXi host type: “/opt/hp/tools/hponcfg -w /tmp/ilo-config.txt | cat /tmp/ilo-config.txt”
This will spit out an XML looking set of config options, at the bottom one should see a ADD USER class, with a USER_LOGIN field.

Now you build an XML file, if you’re puttying into the ESXi host just use vim to paste and edit this:

<ribcl VERSION=”2.0″>
<login USER_LOGIN=”USER_LOGIN” PASSWORD=”NewPassword”>
<user_INFO MODE=”write”>
<mod_USER USER_LOGIN=”USER_LOGIN”>
<password value=”newpass”/>
</mod_USER>
</user_INFO>
</login>
</ribcl>

Just put < and > around them cause apparently you can’t simply display XML code in HTML… opps

Save the file to /tmp/reset_admin_pw.xml and run “/opt/hp/tools/hponcfg -f /tmp/reset_admin_pw.xml”
It should reply complete, now just log into the web interface with the USER_LOGIN ID and NewPassword. While finally in there, create a new default admin and password and document it.
Create your own account with a private password, as the default account should only be used in an emergency.
Also update the firmware to the latest and renew your certs!

Jan 2018 Update

Updated one source link on the drivers source, as HP for some reason didn’t have a redirect to hpe since dividing their company. Again Well done.

2023 Update

ILOREST: Modifying existing ILO IP – Hewlett Packard Enterprise Community (hpe.com)

By FWP – “To everyone coming here searching in vain, trying to figure out this horribly documented convoluted tool and that the above json did not work for either…

THIS is the command you need for ILOrest to change the ILO IP Address from CLI and move on with your life.

Behold…

/opt/tools/ilorest ethernet --network_ipv4 10.10.10.177,10.10.10.1,255.255.255.0

On ESXi with the HP image this is installed in /opt/tools

First field = IP
Second field = Gateway
Third field = Subnet mask.
Comma separated no spaces.

Also to save anyone else hours of looking, to change the ILO Administrator pass from ESXi command line use:

/opt/tools/ilorest iloaccount changepass Administrator

On the latest custom ESXi builds for HPE servers I didn’t see hpocnf, but there was ilorest.
Event ID 21054 error logged on Lync Server 2013

If you manage a Lync 2013 server, you probably have looked through event viewer to find this little bugger; Event 21054.

You’ll notice this event is generated whenever the address book is updated with Update-CsAddressBook cmdlet or after the maintenacne that is run every day.

The following is a sample of the event log information details:

Users are not indexed in the database that should be.

Expected indexed user count: 0

Actual indexed user count: 136

Cause: User replication issue.

Resolution:

Run Update-CsAddressBook to synchronize all accounts.

How lovely, it didn’t resolve the issue. All googling will state run “debug-csaddressbookreplication” and if not indexed objects and Abandonded objects are 0 then…..
You guessed it! MS favorite quote “You can safely ignore it.”
Better yet MS fix this already!

Jan 2018 Update

I have no clue if this is still a problem, I generally don’t look in event viewer unless somethings broken. However if you are running Zenos, PRTG or some other monitoring software that ties into some windows servers event viewer, you’d have to filter it there.

Dealing with Event ID 7000

This event could really be due to a couple things, mostly dependencies.
I came across this error notice while checking my workstations event logs. I noticed these events coming from what should be Trend AV. As Trend is an active AV in use I was concerned about it, however the active AV session was OK and showing green across the board.

Entering the exact info from the event into google prompted a nice forum topic about it. I already did my due diligence by checking local service with an admin account both using the “sc query” command and the “Get-WmiObject win32_service | format-table displayname,name,startname.”
This was enough to show me that tmcomm was not an active service installed on my system. Lucky for me the user on this forum was experiencing a similar issue.
This left me to believe these were old services left behind by a previous version of Trend AV..
Following the advice there, removed the service keys from the registry. Browse to HKey_Local_Machine\System\CurrentControlSet\Services under services key, there are many sub keys, find the one named TmComm and delete it, keys look like a folder.
Once I had removed the key and rebooted I had a clean eventlog!

So those are the basic steps, check log, see event, and verify dependencies are starting. If service name cannot be found using the commands listed above then check the registry under HKLM/SYSTEM/CCS/Services and remove the key for the listed service .
Hope this helps someone else experiencing Event ID 7000 in their eventlogs!

Jan 2018 update

Well done.

Extra Registry Settings in GPME

As a systems administrator you’ll often need to clean up (Group Policies) GP’s in many organizations Windows Domain environments.
Before I get into my story, here is some background info on ADM and ADMX files and templates.

While I was working on cleaning up and verifying processed Policies, I came across one that stated Extra Registry Settings.
Thing to check and note is if the polcies templates are derived from the localstore or a central store.
If its using the local store it will check C:\Windows\inf for .adm files, and C:\Windows\PolicyDefinitions for.admx files.
If using a central store, they will be under PolicyDefinitions under the SYSVOL folder, this is used for replication services.
It’s also important to note that when you add an .adm file to a GP (either User or Computer Category) the adm file gets copied to the policies folder in SYSVOL.

So the first thing I checked was under the poclies ID folder in SYSVOL I found a adm template file, and made a copy of it.
You can open .adm file with notepad, and check here for how they are structured.
After checking the structure of the file it was exactly matched to what was displayed in the Extra Registery settings.
I even enabled the settings, removed the .adm from the GP in GPME, checked the settings tab in GPM and they “Extra Registry Settings” were exactly the same.
I was stumped, I couldn’t figure out what was going on, and the .adm file were in all places Windows would look for them.

I came in this morning and decided to give it one more shot… I just can’t let things go when they bother me, and rebuilding the GPO just didn’t seem like a good solution.
What I did was I took the ValueName, and appended it to the KEYNAME string, I left the Valuename the same, and this was enough to work!
It finally showed the correct heading in GPM, I was able to change their settings, and finally remove the .adm file to have a clean GP!

Jan 2018 Update

It’s been a long time since I had to such things as reverse engineer ADM files. This is a pretty cool post, haha.

Windows Shares over SSH tunnel

I am the worst at writing blogs. I seldem get excited enough to write anything. But today…. TODAY! I feel like this is going to be a good blog.

A fanastic blog… anyway, so I moved into a new place, but have my server still running at my old place I run a very lightwheight server from there.
pssssst, it’s really just a router but perfect for hosting a network shares, torrents, web servers (cough this page), ssh and smb (cough this as well)

If you haven’t heard about DDWRT, I’d suggest you check it out here

Anyway, while i use SSH tunnel to manage this router via CLI, I can always tunnel its web management interface port, to my local machine and manage it that way too.
Yes most changes does cause it do it a soft reboot and breaks the connnection, a simple reconnect after a couple minutes useally all it takes.
I figured I’d just forward the servers SMB port just like I do most of my other ports… to my dismay it didn’t work… so I decided to GOOGLE!

As it turns out, there is more tweaking required to do this that I first thought, like disabling the SMB service at start-up, and using a loopback interface..
If you have a Windows share server (SMB) at home and happened to have SSH for management also available, then check this link out!

Bye for now….

Jan 2018 Update

These are always neat tricks to keep in the back of your head, even if your playing around just for fun. I wouldn’t see the real world use for this type of hack today as everything is pretty much OpenVPN or some other VPN solution. Still love my SSH though.

Lucky the link is still active otherwise this post would be as useless as tits on a bull.

Feb 2019 Update

Mind Blow

This is a blog post from someone at the Dutch National Institute for Subatomic Physics… dude, that’s awesome!!!!!!

Custom Templates, Server 2008 R2 CA Web Enrollment

Usually the issue is one or a combination of the following things below:

1) In certificate template Subject tab wasn’t switched to Supply in request.

2) The enrollment permissions on the certificate are incorrect.

3) The Template was created for a 2008 R2 CA, but the forest level is still on 2003. A 2008 Cert Template can only be selected if the CA is on a 2008 R2 Server, AND the forest level is at 2008 R2.

4) IE was not opened with elevated creds, even if logged in as a domain admin account, right click IE > run as Admin.

5) Last but not least, You have to add the template to the CA to allow it to be issued.
Open Certification Authority MMC snap-in, select Certificate Templates node. In the Action menu, select New and Certificate Template To Issue.

Enjoy signing certificates on your enterprise CA!

Jan 2018 Update

Even I’m not sure what the heck this post was about, but if my memory serves me correctly, it’s when you attempt to use a particular Certificate template in either the MMC snap-in or the CA’s web portal and find the certificate is not available from the drop down menu to be selected.

Kinda wish i would have referenced some of these claims, but I’ll take my own word for it. Haha 🙂

Copying Outlook 2013 Signatures

Using Windows Easy Transfer is amazing tool for when you want to move all your profile settings and personal files from your old system to your new one.
But like everything it’s not perfect, for instance you can’t go from 64 bit – 32 bit (Who would want to…)
You can’t go from WIndows 7 to Windows 8 (Yes it’ll copy your files but not your settings, should be expected, and only via USB HDD)

and one pet pieve that it doesn’t copy over Outlook sugnatures given its located under a user profile directory (C:\Users on Vista and up versions)

Now copy the files from %APPDATA%\Microsoft\Signatures (%APPDATA% is C:\Users\useraccount\appdata\roaming)
Not to be confused with %localappdata% which is C:\users\useraccount\appdata\local

Since these files are hidden system files I suggest to use xcopy with the /i /e /h options.
You can also adjust Windows explorer folder view settings to show hidden and system files.

Once these Files have been copied to the destination machine with the same user at the same directory,
simply reopen outlook and check your signatures! Boom, they are back baby!

Jan 2018 Update Notes

First off, WET is no longer a thing. I will admit I am very sad to see it go, as a systems administrator it was a thing of beauty and made my life a breeze. Sadly now Microsoft has out sourced this to a partner company “Laplink’s PCmover Express“, and even worse it’s a paid product. I personally think its rubbish, you’d be better off updating/upgrading your software manually and simply moving any associated files with that application manually.

Secondly, You’ll notice the use of Environment Variables. Learn em, use em they are a vital tool to management specially with non-default directories or system drives.

Full Remote Admin in Windows Domain

As an Windows Server administrator, you may find yourself wanting to run some commands or do some tasks on an end users system.
Theres an awesome tool package on MS site called sysinternals, developed by an awesome guy named Mark.
However, I was having issues accessing UNC paths until I provided the options for the admin creds,
even though the cmd prompt that was running the psexec command was already elevated with the same creds.
Then I was having issues accesses local system files until I discovered the -h option.

To have full CMD on remote systems:
“psexec \\remotesystem -u domain/adminaccount -p passowrd -h cmd”

The -h is important as it pushes for an elevated token on Vista+ systems.

XCopy source destination /e /i /h (Copy all hidden and system files for profile use)

/e copy directories and subdirectories, including empty ones

/i assums directory on destination if copy more than one file and does not exist

/h copy hidden and system files

Now you can move all your Firefox settings, IE settings, and more remotely!

Jan 2018 Update

Use Robocopy, or better yet; PowerShell, instead of xcopy.