Using FreeNAS as a VM to Test Storage Speeds

Using FreeNAS as a VM to Test Storage Speeds

OK sooo this is gonna seem kinda commical… I

  1. set up a PVE host. Most of which ended up being about storage, I didn’t even blog the actual installation process, I just got right into the storage after a completed installation lol.
  2. wrote a blog attempting to discuss managing a PVE host. A little better cover some basic host management stuff, but again end up talking about VM storage options and performance.. lol
  3. wrote a blog post above recovering a VM from ESXi to PVE using Veeam. Which was also poor, most a just a video reference to a Veeam tech who shows the technical steps, then just me wondering why I got such unreal poor performance from my setup.

I don’t suggest you read any of them cause they are some of the worst blogs I have ever written. They are, however, not entirely useless as they provide some bases to the tests I continue to complete.

So now I had another thought, and can you guess what it was around… yeah… storage… anyway, so if LVMthin is not the best choice for Random IO, and even using the Linux kernel as cache causes issues, what if I just throw the SSDs to a FreeNAS VM. Will it perform better?

My Storage Engineering Journey: Rebuilding Proxmox Local SSD Storage into an Isolated iSCSI San

🛠️ Phase 1: Deconstructing My Original Proxmox LVM Storage

Originally, my Proxmox host had three 240GB Kingston SSDs (sda, sdb, sdc) grouped into a striped LVM volume group called pve-fast. This group hosted an LVM-Thin data pool (fast-data) and an active striped system swap space (fast-swap).
To completely free these drives up for raw passthrough without throwing GUI errors, I opened my Proxmox host SSH shell and dismantled the entire architecture in reverse order:
    1. Remove GUI mapping: I commanded Proxmox to stop monitoring the LVM-Thin dashboard pool:
      bash
      pvesm remove Striped-SSDs
      
    2. Deactivate and scrub the swap space: I disabled the active swap space running on the SSDs:
      bash
      swapoff -v /dev/pve-fast/fast-swap
      

    3. Remove swap from the boot configuration: I edited the filesystem table:
      bash
      nano /etc/fstab
      

      I located the active line /dev/pve-fast/fast-swap none swap sw 0 0 and deleted it (or added a # at the beginning) to prevent my system from hanging or crashing on its next boot.

    4. Destroy the Logical Volumes: I permanently purged the inner allocation containers:
      bash
      lvremove /dev/pve-fast/fast-data -y
      lvremove /dev/pve-fast/fast-swap -y
      
    5. Destroy the Volume Group: I deleted the master pool layout itself:
      bash
      vgremove pve-fast
      

    6. Wipe LVM Labels from Raw Disks: I forced LVM to entirely release its ownership tags over the physical hardware:
      bash
      pvremove /dev/sda /dev/sdb /dev/sdc
      
    7. Verify Everything is Clean: I ran the validation checks to ensure only my main OS boot drives remained:
      bash
      pvs
      vgs
      lvs
      

💾 Phase 2: Passing Individual Raw Disks to TrueNAS

I spun up a brand-new TrueNAS SCALE virtual machine assigned with a flat, stable 16GB of RAM. Because memory ballooning breaks ZFS caching calculations, I disabled ballooning by keeping the Minimum Memory and Maximum Memory values identical inside the Proxmox UI.
    1. Locate My Persistent Disk IDs: I knew using changing identifiers like /dev/sdb would break my VM mapping if I added or removed hardware down the line. I ran this command to pull the unique hardware serial strings:
      bash
      ls -l /dev/disk/by-id/
      

      I copied down my three distinct Kingston identifiers:

        • ata-KINGSTON_SA400S37240G_50026B7785138139
        • ata-KINGSTON_SA400S37240G_50026B77851380CD
        • ata-KINGSTON_SA400S37240G_50026B7785137D21

    2. Map the Disks into the VM: Using the Proxmox host shell, I manually bound the raw block devices to my TrueNAS VM (VM ID 101) sequentially on the SCSI controller, appending critical flags to disable host-level caching and keep Proxmox backup routines from touching my storage array:
      bash
      qm set 101 -scsi1 /dev/disk/by-id/ata-KINGSTON_SA400S37240G_50026B7785138139,cache=none,backup=0
      qm set 101 -scsi2 /dev/disk/by-id/ata-KINGSTON_SA400S37240G_50026B77851380CD,cache=none,backup=0
      qm set 101 -scsi3 /dev/disk/by-id/ata-KINGSTON_SA400S37240G_50026B7785137D21,cache=none,backup=0
      
    3. Force Hardware Serial Numbers: When I first booted the VM, TrueNAS’s ZFS middleware threw validation errors. QEMU passes virtual disks as generic entities, meaning TrueNAS saw three separate paths sharing a blank or overlapping virtual serial identifier. I shut down the TrueNAS VM and edited the backend configuration file on my Proxmox host:
      bash
      nano /etc/pve/qemu-server/101.conf
      

      I navigated to the scsi1, scsi2, and scsi3 entry lines and appended ,serial= followed by their real hardware suffixes directly to the end of the config text:

      text
      scsi1: /dev/disk/by-id/ata-KINGSTON_SA400S37240G_50026B7785138139,backup=0,cache=none,size=234431064K,serial=50026B7785138139
      scsi2: /dev/disk/by-id/ata-KINGSTON_SA400S37240G_50026B77851380CD,backup=0,cache=none,size=234431064K,serial=50026B77851380CD
      scsi3: /dev/disk/by-id/ata-KINGSTON_SA400S37240G_50026B7785137D21,backup=0,cache=none,size=234431064K,serial=50026B7785137D21
      

      After saving and booting TrueNAS up, the duplicate ID issue disappeared completely.


🌐 Phase 3: Building an Isolated Layer 2 Virtual Network

To keep my heavy, high-throughput iSCSI storage data entirely off my flat subnet and isolated from my Management VLAN 21, I engineered an in-memory virtual switch pipeline.
    1. Create the Private Bridge in Proxmox: In the Proxmox Web GUI, I went to Node -> System -> Network -> Create -> Linux Bridge.
        • Name: vmbr1
        • IPv4/CIDR: 10.10.10.1/24
        • Gateway / Bridge Ports: Left completely blank.
        • This isolated the bridge entirely inside host memory, enabling packets to move at CPU speed without hitting a physical switch. I clicked Apply Configuration to spin it up live.

    2. Add a Second NIC to TrueNAS: In VM 101 -> Hardware -> Add -> Network Device.
        • Bridge: Selected vmbr1
        • Firewall Checkbox: Unchecked. This was a critical step. By turning off the Proxmox software firewall for this card, I bypassed heavy packet inspection overhead, saving CPU cycles and ensuring lower latency for my storage loop.

    3. Configure the Storage IP in TrueNAS: I logged into my TrueNAS SCALE web dashboard, opened Network -> Interfaces, and edited the newly populated unconfigured adapter (e.g., vtnet1). I unchecked DHCP and manually assigned a flat Layer 2 static IP configuration:
        • IP Address: 10.10.10.2
        • CIDR: 24
        • Gateway: Left completely blank to eliminate any potential multihoming asymmetric routing loops.

    4. Verify the Pipeline: I went into the Proxmox terminal and ran a quick check to make sure the internal memory link was intact:
      bash
      ping -c 3 10.10.10.2
      

      🏗️ Phase 4: Carving out Zvol and Provisioning the iSCSI SAN

    5. Create My Zvol Container: In TrueNAS SCALE, I went to the Datasets tab in the left panel. I selected my master pool (FastPool), clicked Add Zvol, and input the following configuration parameters:
        • Zvol Name: pve-zvol
        • Size: 450 GiB
        • Sparse Volume: Unchecked (Thick Provisioned). I did this to intentionally carve out and lock down this exact slice of my 639 GiB total raw pool upfront. This prevents Proxmox from accidentally over-allocating storage down the line and protects my ZFS array from hitting 100% capacity and freezing.
        • Compression: LZ4 (Lightning fast, low CPU overhead, reduces physical write amplification by compressing data blocks before they hit flash).
        • ZFS Deduplication: OFF. (I verified this was disabled because dedupe consumes roughly 5GB of system RAM per 1TB of data tracked, which would quickly starve and crash my 16GB TrueNAS VM).

    6. Execute the iSCSI Wizard: I navigated to Shares -> Block (iSCSI) -> Wizard:
        • Target Page: Named it pve-target and set Target Intent to Modern OS.
        • Extent Page: Set Extent Type to Device and selected my new volume FastPool/pve-zvol (450G). Under sharing platform, I selected Modern OS to guarantee proper 512-byte block alignment mapping.
        • Protocol Options Page: Switched the Portal dropdown to Create New, and selected my static storage IP address link 10.10.10.2. I hit save and ensured the global iSCSI service was flipped to Running and configured to Start Automatically.

    7. Map the Target in Proxmox: In the Proxmox Web GUI, I went to Datacenter -> Storage -> Add -> iSCSI:
        • ID: TrueNAS-iSCSI
        • Portal: 10.10.10.2
        • Target: I clicked the drop-down box, and Proxmox instantly queried the virtual switch, auto-populating my exact target IQN string: iqn.2005-10.org.freenas.ctl:pve-target.
        • Use LUNs Directly: Unchecked. By leaving this unchecked, I prevented Proxmox from locking the raw connection down to one exclusive VM.

    8. Layer LVM for Dynamic Multi-VM Support: To allow Proxmox to carve up that 450 GiB network block into multiple separate virtual machine hard drives, I added a management layer. Still under Datacenter -> Storage, I clicked Add -> LVM:
        • ID: iscsi-storage (I discovered this field requires alphanumeric characters/text and cannot be a plain integer like 69).
        • Base Storage: Selected TrueNAS-iSCSI
        • Base Volume: Selects the auto-discovered 450 GiB LUN block.
        • Volume Group: Named it tg-pool.
        • Content: Selected both Disk Image and Container.
        • Shared: Checked.
        • Wipe removed volumes / Allow snapshots as volume-chains: Left both Unchecked to save unnecessary write wear on my consumer SSDs and to bypass broken thin-provisioned snapshot metadata lookups over standard iSCSI blocks.


📊 Performance Testing, Caveats, & Troubleshooting Lessons

I deployed a Windows guest VM directly onto my new iscsi-storage pool and ran benchmarks using CrystalDiskMark. The numbers revealed exactly how complex, multi-layered storage virtualization behaves under the hood.
My Benchmark Results & The ZFS Sync Breakthrough
    • Sequential Reads (~6,193 MB/s): I hit incredibly high, near-PCIe numbers. This proved that TrueNAS’s ZFS ARC (Adaptive Replacement Cache) was working flawlessly—intercepting my test read requests and streaming them directly out of my VM RAM across the high-speed virtual memory switch.
    • The Initial Write Bottleneck (120 MB/s Seq / 1.07 MB/s Random 4K Q1T1): My write metrics initially hit a performance wall. Because Proxmox handles iSCSI network targets with strict write-safety guarantees, it flags every transaction as a Synchronous Write. My consumer-grade Kingston A400 SSDs do not have a physical onboard RAM battery protection module (PLP – Power Loss Protection). As a result, every time a sync request came down the pipe, the drive controllers were forced to freeze operations and perform a hard cache flush down to physical flash cells, tanking my speed.
    • The Performance Fix (283 MB/s Seq / 4.00 MB/s Random 4K Q1T1): To fix this, I adjusted my parameters in the TrueNAS dashboard by going to Datasets, selecting my pve-zvol, and modifying its advanced properties to change Sync from “Standard” to “Disabled”. This forced TrueNAS to treat incoming IO as Asynchronous, allowing my write commands to buffer safely in TrueNAS RAM first. My sequential speeds more than doubled, and my random 4K write speeds instantly surged by 400%.

⚠️ My Lab Warnings & Core Caveats To Remember

    1. The “Virtualization Tax” on RND4K Q1T1: Even with ZFS Sync disabled, my single-threaded, single-queue random writes max out at 4 MB/s (whereas a standalone, bare-metal Windows installation on this same single SSD can easily hit ~25 MB/s). I now understand that this is standard for virtual storage. Forcing a single 4K file over a deep chain of abstraction layers (Windows File System → VirtIO Driver → Proxmox LVM → iSCSI Network → TrueNAS Kernel → ZFS Allocation → Physical Storage Controller) introduces microscopic amounts of computational latency. Because a Q1T1 test forbids parallel actions, the system must wait for a full round-trip confirmation before sending the next block. My parallel performance is healthy, however, as shown by my high RND4K Q32T1 queue numbers.
    2. Why My Old Striped LVM-Thin Setup Died: This project helped me diagnose why my original configuration suffered from terrible 4K performance. Layering an LVM-Thin allocation pool on top of an LVM striped storage block caused severe sector misalignment and block-write amplification. A tiny 4K operating system write would get split across physical drive block boundaries, forcing the host controller to continuously run slow read-modify-write loops across multiple SSDs simultaneously just to update a single 4K data sector.
    3. The Data Integrity Tradeoff: Setting ZFS Sync to Disabled is perfect for my home test lab to achieve fast performance, but it carries a risk. Because TrueNAS is caching incoming writes inside its RAM buffer before they actually finish sinking onto the physical SSD flash chips, a sudden home power outage or a hard freeze of the physical Proxmox host will cause data loss for whatever was floating in memory. This can easily lead to a corrupted VM operating system filesystem.
    4. No Native GUI Snapshot Functionality: Because standard LVM sits on top of raw network blocks, Proxmox’s blue “Take Snapshot” button is greyed out/unsupported for these VMs. If I want to schedule automated backup states or snapshots for my testing, I must manage them directly through TrueNAS’s native ZFS snapshot tasks dashboard at the Zvol level.


Summary, was it faster? Well in terms of I/O performance, technically yes although at the cost of a lot of implementation steps, and at the cost of Server Memory, and CPU threads. Would I recommend this, even for a home lab… meh I mean for learning its cool, but the performance while the SEQ read is kind of insane, it doesn’t provide much practical use.
Here you can see the amount of memory the FreeNAS has to do its ZFS magic, and how much CPU it takes on a high SEQ operation:
no matter what the RAN4K Q1T1 always seem to perform poorly in my tests:
if You have the Memory to spare, and have a decent CPU server with a poor storage controller, this isn’t really that bad of an option, you can also tie it into other PVE bridges/networks and serve other storage needs.
Would I recommend this, over all probably not, not honestly this is more robost then the LVMthin on the striped LVM group of the same SSDs, and disabling the write protection, that caused the entire storage stack to come to a halt and made my one server become unresponsive. “So, I tried this, and with a 64M target saw speeds up to 5x to 10x better results. So, I figured really test it and pick 8GB target file. And the other VM I just migrated onto this host lost it pings. Apparently… Optimizing Proxmox storage using a VirtIO SCSI Single controller paired with io_uring,IO Thread, and Write Back caching can yield a massive 5x to 10x performance boost in small bursts. However, executing a massive storage stress test (like an 8GB CrystalDiskMark run) on budget, DRAM-less hardware (such as Kingston A400 SSDs) can cause a severe cascading system freeze.”
So, this not only performed better, it also did cause a storage kernel panic on the same PVE host. I still tore it down cause it was too much overhead. Still neat to see it work though.

Using Veeam to Migrate from ESXi to Proxmox

Step 1) Have Veeam with Backups from an ESXi Host.

Check.

Step 2) Have a PVE Host.

Check.

Step 3) Add PVE Host to Veeam.

Check. I had a whole bunch of images saved on Img but I lost all the links so the above is a YouTube video that I basically followed to get er done.

The only thing of note here that was annoying is I wanted the worker VM’s network to be in a certain VLAN and the wizard in Veeam didn’t have an option to set it, so I had to enter the network config, and when the wizard was at the testing stage, connect to the PVE host and apply the VLAN tag on the network of the worker VM.

This problem can either be resolved using VNets, SDN for PVE, but the real solution (having a simple text field and applying it into an API call) is “on the roadmap” for Veeam after 2 years knowing about this limitation, that the fix is so simple, it’s mind boggling it not in the initial offering… 

Another thing I found weird with my particular setup (step 2), is that for the snapshot storage I could only pick my EXT4 storage and not the LVMthin.

Step 4) Restore VM to PVE

Even with the worker VM on the host, Veeam wouldn’t give me recovery speed or estimate to recovery, I used the glances command on the PVE host and noticed it was indicating CPU-IOWAIT was the bottle neck,  and seeing the logical disk and each SSD in glances showing only roughly 3 MB/s. I believe this might be due to how the worker VM was configured for its storage settings and how it coded. Took 6 hours but it did work once I did these steps after Veeam said success.

It worked but it wouldn’t boot even with the SCSI controller set to VMware SCSI. I had to detach the HDD, and reattach using SATA and then under VM options pick it for the boot order.

Network wasn’t working had to apply VLAN manually, then install virtio drivers to see the NIC, then manually re-IP and it said IP on old phantom NIC, so remove from that? yes, and network back up.

*Note you should really uninstall VMware tools…. cause for some reason the UN-installer does a hardware check to see if it is a VMware VM, I remember this from when I did a V2P a while back, what does Broadcom have to say about it? “Fuck you, if you didn’t remove the application before converting… fuck you. Uninstaller won’t work, sit there like a tattoo, fuck you bruuuh.”

Quoted from this KB

Issue/Introduction

  • A Windows virtual machine was migrated from vSphere to a non-vSphere environment without uninstalling VMware Tools.
  • Microsoft installer fails to uninstall the VMware tools.
  • No errors are identified during the uninstallation process.

Cause

After migrating the VM to a different platform, the VMware Tools uninstallation process fails because the virtual machine is not running within a vSphere environment.

Resolution

  • This is an expected behavior. <- AKA: We coded this deliberately
  • VMware Tools should be uninstalled prior to migrating the virtual machines out of the vSphere environment. <- AKA: You should of been a perfect admin.
  • Once the migration is completed, the virtual machine is no longer under the support of VMware by Broadcom. <- AKA: Fuck you!

Maybe I’ll cover a blog doing that, but I forgot in my test example. So, make sure you have the latest backup of the VM after removing VMware tools.

Issue #1

Storage Speeds

If you check out, Managing a Proxmox Host – Zewwy’s Info Tech Talks, you can see on the Test VM my Crystal Disk mark speeds and it performed poor on the RAN-t1q1 R/W but the others were fine. I asked AI, it mentioned that LVMThin and the lack of the battery write cache, and the fact it’s DRAM less SSDs creates the issue.

1. The LVM-Thin “Allocation on Commit” Penalty
LVM-Thin allocates space dynamically on demand. When a brand new Windows VM runs CrystalDiskMark, it writes to sectors that have never been written to before.
Every single time a tiny 4KB write occurs, the host operating system has to pause, check the hidden LVM metadata tracker, carve out a raw block from the pool, update the metadata index, and then commit the write. Doing this chunk-by-chunk at Queue Depth 1 (one file at a time) destroys random I/O performance.
2. The Interleaved Stripe Stripe-Size Mismatch
When you created the volume, you explicitly declared a 64k stripe size (-I 64k) across 3 disks (-i 3). This means LVM expects data chunks to be written in 192KB sweeps (64KB x 3) to evenly split the load.
  • CrystalDiskMark is attempting to write a tiny 4KB packet.
  • 4KB is a fraction of a single 64KB stripe.
  • Because it doesn’t span all three drives, the kernel doesn’t gain parallel execution speed. Instead, the storage driver must execute a Read-Modify-Write (RMW) cycle, adding physical disk latency overhead to a minute transaction.
3. Missing VirtIO SCSI Drivers & Write Caching
If you are testing this inside a fresh Windows VM without optimizations, Windows defaults to a generic IDE/SATA controller emulation, which forces synchronous, non-cached writes. Coupled with your HPE B140i controller lacking a battery-backed physical cache, Windows is forcing every single 4KB block to wait until the flash chips on the Kingston A400 SSDs send an physical acknowledgment back up the chain.
For point 3, I didn’t tell AI about my test and second blog post where I actually did cover the difference in the different virtual controllers. However, as we saw we didn’t get much better performance in the RANIO results, OK double in the reads but nothing in the writes. It suggested to change the cache to write back

So I tried this, and with a 64M target saw speeds up to 5x to 10x better results. So I figured really test it and pick 8GB target file. And the other VM I just migrated onto this host lost it pings. Apparently…

Optimizing Proxmox storage using a VirtIO SCSI Single controller paired with io_uring,IO Thread, and Write Back caching can yield a massive 5x to 10x performance boost in small bursts. However, executing a massive storage stress test (like an 8GB CrystalDiskMark run) on budget, DRAM-less hardware (such as Kingston A400 SSDs) can cause a severe cascading system freeze.
Here is exactly what happens behind the scenes when a heavy synthetic workload breaks a virtualized storage layer:
  • The Host RAM Trap (Linux Dirty Throttling): When a VM uses Write back caching, the Proxmox host intercepts writes and absorbs them instantly into its own memory pool. However, once the cache volume hits Linux’s internal threshold (dirty_ratio), the kernel hits an emergency brake. It forcefully halts all concurrent disk I/O requests across the entire storage layer to flush the data down to the physical disks.
  • The DRAM-less Wall: Consumer-grade SSDs lack dedicated onboard DRAM to map where files live. Under a massive, continuous random 4K write assault, their internal Flash Translation Layer (FTL) becomes heavily bottlenecked. Once their small, temporary SLC burst cache fills up, write speeds plunge down to a crawl (1–2 MB/s), causing I/O latency to spike into full seconds.
  • The LVM Storage Deadlock: With the physical drives running at a snail’s pace, the Linux kernel thread managing the thin-LVM volume pool drops into an Uninterruptible Sleep (D state). While the main Proxmox Web GUI stays responsive, any management process trying to hook directly into the VM’s active hardware layer—such as the vncproxy console stream—locks up instantly. The target guest VM drops completely off the network because its virtual hard drive stops responding.
The Fix & Takeaway: To safely benchmark real-world storage limits without triggering a host-level queue lockup, bypass the host RAM cache entirely by setting the VM disk cache mode to Default (No Cache) or Write through.
More testing and learning to commence. interesting finds.

Managing a Proxmox Host

In my last post we went over installing a Proxymox host and we did a fair bit of managing already… ok mostly just storage but we had to manage the host after the initial install of the base OS. This should be pretty obvious, it’s a web interface, which is stated right on the Console output after you install. All the commands in the previous blog could have all been done from the direct system console, but also via remote SSH.

So, first act is to change the update repo, by removing the enterprise ones and adding the no-sub repo for updates. This alone won’t resolve the nagging pop up when you log in about having no subscription. to get rid of that:

Remove the annoying subscription pop-up

  1. Open the Shell terminal from your Proxmox web UI or connect via SSH as root.
  2. Navigate to the widget toolkit directory:
    cd /usr/share/javascript/proxmox-widget-toolkit/

    Make a backup copy of proxmoxlib.js:

    cp proxmoxlib.js proxmoxlib.js.bak
    
  3. Open the file in a text editor like nano:
    nano proxmoxlib.js
    
  4. Search for the text active (press Ctrl + W in nano).
  5. Locate the conditional check that looks for an active status, which typically contains !== 'active' or !res logic. Change the inequality exclamation mark ! to make it an equality check == 'active' (removing the ! so it evaluates positively instead of triggering the warning when inactive). Alternatively, comment out or bypass the function call according to your specific Proxmox minor version.
  6. Save the file (Ctrl + O, then Enter) and exit (Ctrl + X).
  7. Restart the Proxmox proxy service to apply the change:
    systemctl restart pveproxy.service
    
  8. Perform a hard refresh or clear your browser cache (Ctrl + F5)

System Resources

I basically just click on the host summary tab. or a VMs summary tab.

Or install “glances” on the terminal shell.

Networking

I know, I know, you’re probably screaming about authentication and user management, groups, permissions. probably yelling “RBAC!!” I’m gonna stick to using root for now and concentrate on infrastructure stuff for now.

When configuring Proxmox in a multi-subnet or VLAN environment, you quickly run into the limitations of the Linux kernel’s “Weak Host Model,” which handles routing very differently than enterprise firewalls like Palo Alto Networks (PAN-OS). Unlike zone-based firewalls that use policy-based forwarding to automatically reply out of the same interface a packet arrived on, Linux relies strictly on destination-based routing tables. This becomes a major trap if you assign identical or overlapping subnets to multiple network interfaces; even if you physically unplug a network cable, the Linux kernel holds onto that dead route at the top of its table. This causes traffic to be shoved down a disconnected interface, resulting in frustrating “No Route to Host” errors and dropped connections, even when your other live interface is perfectly configured.

Furthermore, setting up multi-homed access to the Proxmox Web UI introduces asymmetric routing challenges, as Linux only permits a single global default gateway by default. If traffic arrives on a secondary VLAN interface, Proxmox will mistakenly attempt to send the reply back out the primary management gateway, causing firewalls to log “aged out” or “incomplete” states due to the routing mismatch. To resolve this, administrators must either use the CLI to inject custom policy-based routing rules (ip rule and separate routing tables) into the network configuration file or cleanly isolate their subnets by stripping duplicate IP layers off disconnected bridges. Additionally, when testing these secondary access points, remember that the Proxmox web service strictly binds to its local hosts configuration and requires explicit HTTPS formatting over port 8006 (https://<IP>:8006) to successfully initialize a session.

That’s a long winded way to say that when I was trying to keep the flat home network (untagged) ip address on the Proxmox server, while also giving it a virtual interface attached to another VLAN tagged subnet. It wouldn’t connect (or it wouldn’t load) the web interface from my home untagged network, even though it was routed, and tagged properly on all network devices along the network path.

So from what I can tell:

a “Linux Bridge” is like a vmware vSwitch. You define the physical connection the host has to these bridges.

a “Linux VLAN” is like a VMK. This is where you define another IP address the host can use. You select which device by defining VLAN raw device, which seem you can pic the physical NIC or the bridge, I don’t know the implication if you pic the nic when its already configured for a bridge though… I’m still learning here.

When you edit a VMs NIC settings you pick a bridge, and you can define what vlan the traffic will be at the VMs NIC settings, this is like the VMPG on ESXi.

Did I break updates from this… yup looks like it.. DNS works.. but can’t reach out anywhere or yeah.. locked down subnet, that was easily fixed.

Edited a VM NIC settings, change bridge, added VLAN Tag. Disconnect, power on VM, apply static IP, change to connect, yup.. works just fine.

To move the MGMT IP of the PVE host from untagged, to tagged follow these steps. Here’s a chart to help with making a decision on how to configure your network stacks accorindgly:

Goal Right Approach How it works
Give TrueNAS multiple IPs on the same network IP Aliases Keep a single physical network cable connected. Go to network settings and add multiple IP addresses (aliases) to that single interface.
Increase Bandwidth / Redundancy Link Aggregation (LACP / Bond) Combine both physical connections into a single logical Bond interface (bond0). Your switch must support LACP (802.3ad) to gain multi-user bandwidth. (If you want to have an IP address work on any interface, then create the bond (as failover type) and assign IP, if you need it tagged leave IP undefined and create a VLAN interface and attach to this bond.)
Isolate Virtual Machines / Apps Network Bridge Create a br0 bridge interface, strip the IP from your physical NIC, and assign it to the bridge instead. Your apps, VMs, and TrueNAS host will share it cleanly.
SMB Multichannel / High-Speed Storage Distinct Subnets Change the IP scheme on the second interface to a completely separate subnet (e.g., 192.168.2.X). Ensure your client machine also has a NIC configured on that separate subnet.

Step 1) Bridge Needs to be VLAN aware

In my case using the base bridge vmbr0.

PVE host (left hand side) -> System -> Network -> vmbr0 -> edit -> Check off VLAN Aware.

Step 2) Create a VLAN

Under name give it vlan#, where # corresponds to the VLAN tag you need applied.

Set the IP address and the new Gateway (if it complains about gateway already set on the bridge network, make sure you remove the gateway from it, and it’s IP address else you’ll fall into the problem I described at the beginning of this networking section.)

Step 3) Apply the Config

Hit Apply at the top and watch the ping flip over…

Step 4) Change IP under /etc/hosts

nano /etc/hosts

Find your old IP and update, otherwise things like creating cluster info will bind to old IP in the cluster info.

Interacting with VMs

Virt-Viewer and Virt-Manager

PVE has the web console built right in, so you can just manage the VM directly that way. I like being able to have an app window for the connection much like VMRC for VMware. Which PVE has, called Virt-viewer, get it here: Virtual Machine Manager. I installed the Winx64 binaries.

One trick I like to do is connect a USB stick to my main mgmt machine, then copy files to it, then to a VM if I need to get files on to said VM if the VM is an offline only machine.

Since I deployed this VM from a generalized image I had created I needed to pick a storage controller that I knew would be natively available to the image I was using so I stuck with the LSI, I installed virt-viewer so SPICE as my GPU, and again a native supported NIC, so the E1000.

As you can also see, they are all generic drivers, but.. working:

So as you see, not terrible, but also not crazy, I know those 3 SSDs can perform better then these results since I did an I/O test on them via the host backend, so I’m assuming I have so loss in the virtual bus controller (the LSI 53C) or the standard Windows drivers. So, the first thing I want to test is installed the guest tools, will they change how devices show in the device manger, and will there be any performance increases?

Spice Guest Tools

So downloaded them on the guest VM from “www.spice-space.org/download.html”

not sure what was up with the serial driver, but I just accepted it:

Well…

Windows Main Device? No USB Trick for you!

  1. Even after all that, the video drivers showed up without basic drivers, and I can move in and out of the VM in the virt-viewer with having to press CTRL+ALT+R. That’s Good.
  2.  The Storage device in device manager still shows generic SATA ACHI so I don’t believe I’ll get any better I/O results.
  3. Attempting to add a SPICE USB port to the VM hardware worked but…

after shutting down the VM and power it back on, the device list wasn’t greyed out and showed one free channel. but picking any of my devices…

ok… this might be cause my mgmt machine is Windows?

I want to like PVE, but there are a lot of little niche things that are pissing me off about it. Then when you want to use SPICE with virt-viewer, it downloads a spice.vv file that you have to open, which auto deletes when the VM is shutdown or close (haven’t tested this). just feels like weird UX. anyway…

Storage Controller vs Virtual Hard Drives

I changed the SCSI controller from LSI 53C to VirtIO SCSI Single. But when I booted the VM back up I still saw the same generic SATA ACHI Controller. I felt like there was some ignorance on my part so I asked AI for any insights, it informed me to add a drive cause the type on the actual virtual disk could still be bound to the old type. So I temp added a disk (just for testing) and changed the connection from SATA to SCSI and checked the dev mgmt and ran a test and the performance was a fair bit better…

compared to

Performance Increase Overview

Benchmark Test Metric Type Performance Change Percentage Increase
Seq1M-Q8T1 Read 433 MB/s → 651 MB/s +50.3%
Write 56 MB/s → 95 MB/s +69.6%
Seq1M-Q1T1 Read 400 MB/s → 511 MB/s +27.8%
Write 51 MB/s → 54 MB/s +5.9%
Ran4K-Q32T1 Read 14 MB/s → 136 MB/s +871.4%
Write 7 MB/s → 7 MB/s 0.0% (No Change)
Ran4K-Q1T1 Read 6 MB/s → 13 MB/s +116.7%
Write 1.5 MB/s → 2 MB/s +33.3%

Key Takeaways
  • Massive Random Read Improvement: The biggest leap is in Ran4K-Q32T1 Read, sky-rocketing by 871.4%. This means heavy multi-threaded background random tasks will feel exponentially faster.
  • Solid Sequential Gains: Large file transfers (Seq1M) see a great bump, with reads improving by roughly 28% to 50%, and multi-queued writes jumping by nearly 70%.
  • Lagging Write Speeds: Random deep-queue writes (Ran4K-Q32T1) didn’t improve at all, and sequential single-thread writes (Seq1M-Q1T1) only crawled up by 5.9%.

That’s a bit improvment, I need to get the base OS HDD on this new type to gain the performance increase. Do to that:

Swap the Real Drive to SCSI

  1. In the Proxmox Hardware tab, select the 1 GB dummy disk you just made and click Detach. Then select the detached unused disk and click Remove.
  2. Select your main Windows boot disk (currently sitting on sata0 or ide0) and click Detach. It will immediately drop down to the bottom of the hardware list as an Unused Disk 0.
  3. Double-click that Unused Disk 0.  (I don’t know why double click seemed the only option I couldn’t see any action items at the top)
  4. In the pop-up window, change the Bus/Device dropdown to SCSI (it will likely assign scsi0). Click Add.

Fix the Boot Order

  1. Go to the VM’s Options tab in Proxmox.
  2. Double-click Boot Order.
  3. Check the box for your newly reattached scsi0 drive and drag/button it to the very top of the list so it is the primary boot device. Click OK.

Yeah for some reason it wasn’t checked off, so reattaching a vHDD has this implication something I didn’t instinctively had to do, in the snip above I unchecked net boot and checked off the scsi0.

Start your VM. before I ran the test I wanted to make sure the baseline VM was fine for it since now it was the Windows main OS drive that was running on the new virtual SCSI bus. however sure enough windows updates were alerady hitting the disk and the CPU.. I noticed it in task a manager, which was also showing me…
like what?! 84% active time constant, with a contant 800+ ms repsonse time and a measly 1.7MB/s … is windows doing insane I/o and bottle necking the I/O bus? was the theory all BS, or would this have happened on the settings I had before…? So many questions, so little answers… but the results are not good the Windows updates process is low CPU and high wait time on disk it seems the disk is slowing things down….
well system is back to idle windows updates completed.. lets see what diskmark has to say… shows the same results as “D:\” so we should have got the I/O performance increase, yet.. I remain skeptical….

Summary

So, we touched a bit on some basic management of a Proxmox host, like checking system resources, networking, storage, and managing VMs. Each of these are not covered in depth by any means, but just the simple fundamentals to getting a VM up and running and basic management of them.
These fundamentals are needed for the next stage, migrating VMs from ESXi to ProxMox. I know, I know, you’re saying I already did a basic pilot of that in the past here: Migrate ESXi VM to Proxmox – Zewwy’s Info Tech Talks but that was a bare metal, bare FS and using a linux VM with a convertion tool to just convert the  base HDD and it’s associated FS intact the version required by the hypervisor. It also took a lot of space, bandwidth, I didn’t explain what each step was really doing in detail. Anyway, long story short in the next blog post I’m gonna see how we can use Veeam to do a migration instead of a linux machine.
Setting up a Proxmox host

Install Proxmox

Hardware

Step 1) Pick Hardware. Important is CPU support. Mostly ARM or x86_64.
– My host a HPE DL160 G9.

Software

Step 2) Install using appropriate installer image.
– In my case x86_64 version 9.2
– I installed to an internal 32GB sd card.

Storage (Physical)

Step 3) VM Storage.
I’ve discussed this in the past specially when it comes to shared storage options. There you can see a picture of all the options available to Proxmox, and if it supports snapshots or if its shared. For ease sake of this post we’re going to stick to local storage.  With the minted information from that chart alone ZFS would seem the winner, however….

Choosing the right storage architecture for a virtualization host requires a careful balance between resource allocation, hardware capabilities, and performance goals. For this build—featuring 50 GB of memory, an HPE B140i controller running in SATA AHCI pass-through mode, and a mix of SSDs and a mechanical drive—maximizing raw performance and preserving system RAM for virtual machines is our primary objective. By selecting LVM-Thin instead of ZFS, we bypass the heavy computational and memory overhead of a Copy-on-Write filesystem, ensuring that nearly all 50 GB of RAM remains dedicated strictly to our workloads. The design stripes multiple solid-state drives into a single, high-performance LVM-Thin volume group to multiply IOPS and throughput for VM boot disks. Meanwhile, the standalone 4TB spindle drive is formatted as a standard, zero-RAM-footprint Linux directory to act as an isolated target for possible Proxmox backups and static file shares. This hybrid, LVM-centric approach eliminates storage controller bottlenecks, maximizes the lifespan and speed of our SSDs, and relies on a robust backup strategy rather than restrictive hardware or software redundancy.

After messing around about an hour, I found out the reason I wasn’t seeing the drives was due to a controller configuration (it was already set to Sata AHCI support mode), which I double verified by seeing the disks and running dd commands against them to get sequential performance numbers. The reason, was cause apparently in this mode drives are not hot swapable.

Could attempt a manual rescan via the shell backend, I guess but as noted there. “If your SATA controller supports hot swap, it should “just work(tm).”

<rant> Stupid ass HP, always causing me to waste my life away cause of their stupid ass storage controller and firmware/driver choices.. ughhh </rant>

Turn off Swap

SIDE QUEST! Congratulations you just entered a side quest on your way to configuring your storage for your PVE hypervisor. SWAP!

An critical optimization step for any Proxmox host booting from flash media is managing the system’s swap space. By default, the Debian-based Proxmox installer creates a virtual memory swap partition directly on the boot drive. When running Proxmox from an internal SD card, leaving swap enabled is a hardware hazard; Linux will continuously shift idle processes onto the card, exhausting its low write-endurance and risking boot environment corruption. Because this host boasts a healthy 50 GB of physical RAM, we immediately disabled and removed the default swap volume to shield the SD card from unnecessary wear. However, completely lacking a swap space can lead to kernel instability under unexpected memory spikes. Our strategy resolves this by re-establishing a dedicated swap space directly on our new solid-state storage tier. Crucially, this swap will not be placed inside the dynamic LVM-Thin pool—which can cause file system deadlocks and severe latency—but will instead be carved out as a fixed, pre-allocated ‘Thick’ LVM volume. This hybrid approach ensures the SD card remains read-heavy and protected, while giving the host an ultra-fast, safe SSD safety net without sacrificing valuable system memory to ZFS.

1. Turn off active swap immediately

swapoff -v /dev/mapper/pve-swap

2. Stop it from turning back on when you reboot

Open your filesystem table:
nano /etc/fstab
Look for the line that mentions pve-swap. It will look similar to this:
/dev/pve/swap none swap sw 0 0
Add a # at the very beginning of that line to comment it out and disable it permanently:
# /dev/pve/swap none swap sw 0 0

3. Delete the volume entirely (Optional but recommended)

To ensure the OS never touches it again, remove the logical volume entirely:
bash
lvremove /dev/pve/swap
Now with swap off we can finally build our LVM groups and move the swap to the SSDs.

Back to Storage (Logical)

Step 1: Create the Physical Volumes (PV)

First, we tell LVM that these three specific SSDs are ready to be used as raw storage building blocks.
pvcreate /dev/sda /dev/sdb /dev/sdc
Expected output: Physical volume "/dev/sda" successfully created. x3

Step 2: Combine them into a Volume Group (VG)

Now, we pool those three independent drives into one large, unified storage pool. We will name this group pve-fast.
vgcreate pve-fast /dev/sda /dev/sdb /dev/sdc
Expected output: Volume group "pve-fast" successfully created.

Step 3: Verify the Master Pool

To confirm everything was combined properly and to check your exact total available space, run:
bash
vgs pve-fast
You should see pve-fast listed with 3 physical volumes (#PV) and a total size that roughly equals the combined capacity of your three SSDs.
root@g9-pve:~# pvcreate /dev/sda /dev/sdb /dev/sdc
Physical volume "/dev/sda" successfully created.
Physical volume "/dev/sdb" successfully created.
Physical volume "/dev/sdc" successfully created.
root@g9-pve:~# vgcreate pve-fast /dev/sda /dev/sdb /dev/sdc
Volume group "pve-fast" successfully created
root@g9-pve:~# vgs pve-fast
VG #PV #LV #SN Attr VSize VFree
pve-fast 3 0 0 wz--n- <670.70g <670.70g

Creating the Volume Group (VG) only defines the boundaries of your master pool. It tells LVM: “You are allowed to use the storage blocks inside sda, sdb, and sdc.” It does not decide how data is laid out yet.

The master pool itself is neutral. The choice between Linear or Striped happens entirely in the next step when we create the Logical Volumes (LVs) inside that pool. Why it’s like this, I dunno, I’m just here to figure out how it works.

Back to Swap

We will allocate 4 GB of space for this safety net. We will use the -i 3 flag to guarantee that any memory swapped to disk is interleaved across all three SSD controllers simultaneously for maximum throughput.
Run these four commands sequentially in your Proxmox CLI:

1. Create the Striped Logical Volume

We will carve out a new volume named fast-swap from your pve-fast volume group.
lvcreate -L 4G -i 3 -I 64k -n fast-swap pve-fast

    • -L 4G: Allocates exactly 4 Gigabytes of space.
    • -i 3: Forces the volume to stripe data across exactly 3 physical disks (RAID0 behavior).
    • -I 64k: Sets the optimal block stripe size for performance.

2. Format the Volume for Swap

Now we tell the operating system to format this new striped block device specifically as Linux swap space.
mkswap /dev/pve-fast/fast-swap

3. Activate the New Swap Space

Turn on the newly created SSD swap space right now so the system can begin utilizing it.
swapon /dev/pve-fast/fast-swap

4. Make it Permanent Across Reboots

We need to register this new location in your system’s filesystem table so it mounts automatically every time the server turns on. Run this command to append the new rule to your configuration file:
echo '/dev/pve-fast/fast-swap none swap sw 0 0' >> /etc/fstab

Verify the Configuration

To verify that your swap is active, running at top speed, and no longer touching your 32 GB SD card, run:
swapon --show
You should see /dev/mapper/pve--fast-fast--swap listed as the sole active device, confirming your SD card is safe.
root@g9-pve:~# lvcreate -L 4G -i 3 -I 64k -n fast-swap pve-fast
Rounding size 4.00 GiB (1024 extents) up to stripe boundary size <4.01 GiB (1026 extents).
Logical volume "fast-swap" created.
root@g9-pve:~# mkswap /dev/pve-fast/fast-swap
Setting up swapspace version 1, size = 4 GiB (4303351808 bytes)
no label, UUID=a6ec7580-dc9c-40de-8405-b9f8c66a41fd
root@g9-pve:~# swapon /dev/pve-fast/fast-swap
root@g9-pve:~# echo '/dev/pve-fast/fast-swap none swap sw 0 0' >> /etc/fstab
root@g9-pve:~# swapon --show
NAME TYPE SIZE USED PRIO
/dev/dm-0 partition 4G 0B -1
root@g9-pve:~# fdisk -l | grep mapper
Disk /dev/mapper/pve-root: 12.8 GiB, 13740539904 bytes, 26836992 sectors
Disk /dev/mapper/pve--fast-fast--swap: 4.01 GiB, 4303355904 bytes, 8404992 sectors
K we’re finally done with swaps. I asked AI why I wasn’t seeing any partitions on the SSDs after allocating them to the LVM pool. it stated:

“When we ran the pvcreate command earlier, LVM took over the raw, unpartitioned block devices (sda, sdb, sdc) directly, rather than writing a traditional partition table like MBR or GPT.

Why LVM Prefers No Partition Layout
Tools like fdisk and gparted look for standard partition tables to tell them where a drive starts and ends. LVM bypasses this entirely:
    1. Direct Disk Ownership: LVM wipes out the standard partition header area and writes its own metadata directly to the very first sectors of the raw disk.
    2. Simplified Layout: Because we are striping these drives together, creating individual partitions (like sda1, sdb1) is an unnecessary extra layer of management. By giving LVM the raw disks, it can seamlessly manage the entire drive boundary.

How to Properly View Your LVM Layout
Because fdisk doesn’t natively parse LVM metadata structures, it will report that the disks look empty. To see the true reality of your storage, you must use LVM-specific inspection commands instead:
    • To see the raw disks LVM owns: pvdisplay or pvs
    • To see your combined master pool: vgdisplay or vgs
    • To see the striped swap volume we just carved out: lvdisplay or lvs"

Take this with a grain of sand I do not know if its true but seems that way.

root@g9-pve:~# fdisk -l
Disk /dev/sda: 223.57 GiB, 240057409536 bytes, 468862128 sectors
Disk model: KINGSTON SA400S3
Units: sectors of 1 * 512 = 512 bytes
Sector size (logical/physical): 512 bytes / 512 bytes
I/O size (minimum/optimal): 512 bytes / 512 bytes
Disk /dev/sdb: 223.57 GiB, 240057409536 bytes, 468862128 sectors
Disk model: KINGSTON SA400S3
Units: sectors of 1 * 512 = 512 bytes
Sector size (logical/physical): 512 bytes / 512 bytes
I/O size (minimum/optimal): 512 bytes / 512 bytes
Disk /dev/sdc: 223.57 GiB, 240057409536 bytes, 468862128 sectors
Disk model: KINGSTON SA400S3
Units: sectors of 1 * 512 = 512 bytes
Sector size (logical/physical): 512 bytes / 512 bytes
I/O size (minimum/optimal): 512 bytes / 512 bytes
root@g9-pve:~# pvs
PV VG Fmt Attr PSize PFree
/dev/sda pve-fast lvm2 a-- <223.57g 222.23g
/dev/sdb pve-fast lvm2 a-- <223.57g 222.23g
/dev/sdc pve-fast lvm2 a-- <223.57g 222.23g
/dev/sde3 pve lvm2 a-- <29.22g 3.63g
root@g9-pve:~# vgs
VG #PV #LV #SN Attr VSize VFree
pve 1 2 0 wz--n- <29.22g 3.63g
pve-fast 3 1 0 wz--n- <670.70g 666.69g
root@g9-pve:~# lvs
LV VG Attr LSize Pool Origin Data% Meta% Move Log Cpy%Sync Convert
data pve twi-a-tz-- <10.79g 0.00 1.58
root pve -wi-ao---- <12.80g
fast-swap pve-fast -wi-ao---- <4.01g

Back to Storage

So now I just need another logical volume for the VM high speed OS vHDDs.
When I tried to assign 100% of the remaining space to the VM data volume, I hit a common LVM roadblock: the thin-pool conversion failed due to insufficient free space (0 extents). This happens because an LVM-Thin pool needs a tiny bit of unallocated space left over to build its hidden metadata index for tracking snapshots. To fix this, I deleted the raw volume and recreated it using 99%FREE of the remaining pool instead. This small tweak left plenty of breathing room for the tracking database while keeping the 3-disk stripe perfectly aligned.

1: Recreate it with 99% of the pool space

By allocating 99%FREE instead of 100%FREE, we guarantee there is plenty of room left over for the metadata engines while still satisfying the stripe alignment requirements.
lvcreate -l 99%FREE -i 3 -I 64k -n fast-data pve-fast

2: Convert it to a Thin Pool

lvconvert --type thin-pool pve-fast/fast-data
Once it says successfully converted, run the final step to link it to your Proxmox dashboard:
pvesm add lvmthin Striped-SSDs --vgname pve-fast --thinpool fast-data

The conversion went through smoothly, and the high-speed storage tier is now online in the Proxmox GUI under the name Striped-SSDs

Quick Sequential I/O test:

root@g9-pve:~# swapoff /dev/pve-fast/fast-swap
root@g9-pve:~# dd if=/dev/zero of=/dev/pve-fast/fast-swap bs=1M count=2000 status=progress conv=fdatasync
2000+0 records in
2000+0 records out
2097152000 bytes (2.1 GB, 2.0 GiB) copied, 3.59334 s, 584 MB/s
root@g9-pve:~# swapon /dev/pve-fast/fast-swap
swapon: /dev/mapper/pve--fast-fast--swap: read swap header failed
root@g9-pve:~# mkswap /dev/pve-fast/fast-swap
Setting up swapspace version 1, size = 4 GiB (4303351808 bytes)
no label, UUID=aa6557d6-626b-4680-9741-2b63a1f55a13
root@g9-pve:~# swapon /dev/pve-fast/fast-swap

More Storage

Yes even more storage, while we used LVM to stripe across our 3 SSDs. We are going to use Ext4 on the 4TB Drive to host ISOs, or large disk virtual drives on the VMs.

1. Create a Standard Partition Table

We will write a clean, modern GPT partition table to the raw drive and create a single partition that takes up 100% of the 4TB space.
parted -s /dev/sdd mklabel gpt mkpart primary ext4 0% 100%

2. Format the Partition as Ext4

Now, we format that fresh partition (/dev/sdd1) with the standard Linux Ext4 filesystem. This handles sequential data streams beautifully on mechanical platters.
mkfs.ext4 /dev/sdd1

3. Create a Mount Point and Mount the Drive

We will create a permanent folder on your host OS and mount the physical drive into it.
mkdir -p /mnt/pve/mass-storage
mount /dev/sdd1 /mnt/pve/mass-storage

4. Make the Mount Permanent Across Reboots

To make sure Debian hooks this drive back up every time the server boots, we add its unique identification to your filesystem table (fstab). Run this command to fetch the drive’s unique ID and automatically write the mount rule:
echo "/dev/sdd1 /mnt/pve/mass-storage ext4 defaults,noatime,nofail 0 2" >> /etc/fstab
(Note: noatime eliminates unnecessary write cycles to track when files are read, and nofail ensures your Proxmox host still boots perfectly even if the 4TB drive is unplugged).

4. Register the storage for the Proxmox GUI

Finally, run this command to tell Proxmox that this folder is ready to accept backup files, ISOs, and VM disks:
pvesm add dir Mass-Storage --path /mnt/pve/mass-storage --content backup,iso,images

Verify Your Entire Server Storage Layout

Now that everything is fully configured, your storage is split perfectly into two distinct, high-efficiency worlds. If you run:
df -h /mnt/pve/mass-storage
root@g9-pve:~# parted -s /dev/sdd mklabel gpt mkpart primary ext4 0% 100%
root@g9-pve:~# mkfs.ext4 /dev/sdd1
mke2fs 1.47.2 (1-Jan-2025)
Creating filesystem with 976754176 4k blocks and 244195328 inodes
Filesystem UUID: 84d88803-a246-4067-8cec-3a93ba188169
Superblock backups stored on blocks:
32768, 98304, 163840, 229376, 294912, 819200, 884736, 1605632, 2654208,
4096000, 7962624, 11239424, 20480000, 23887872, 71663616, 78675968,
102400000, 214990848, 512000000, 550731776, 644972544

Allocating group tables: done
Writing inode tables: done
Creating journal (262144 blocks): done
Writing superblocks and filesystem accounting information: done

root@g9-pve:~# mkdir -p /mnt/pve/mass-storage
root@g9-pve:~# mount /dev/sdd1 /mnt/pve/mass-storage
mount: (hint) your fstab has been modified, but systemd still uses
the old version; use 'systemctl daemon-reload' to reload.
root@g9-pve:~# systemctl daemon-reload
root@g9-pve:~# echo "/dev/sdd1 /mnt/pve/mass-storage ext4 defaults,noatime,nofail 0 2" >> /etc/fstab
root@g9-pve:~# dd if=/dev/zero of=/mnt/pve/mass-storage/zerofile bs=1M status=progress conv=fdatasync
78979792896 bytes (79 GB, 74 GiB) copied, 293 s, 270 MB/s
root@g9-pve:~# dd if=/dev/zero of=/mnt/pve/mass-storage/zerofile bs=1M status=progress oflag=direct
2867855360 bytes (2.9 GB, 2.7 GiB) copied, 33 s, 86.9 MB/s

Summary: Proxmox VE Storage Architecture: Maximizing Performance and RAM with a Non-Cached Controller

When designing local storage for a hypervisor host, the default answer is often to throw everything into a ZFS pool. However, storage architecture should never be a one-size-fits-all solution. For this Proxmox VE build—featuring 50 GB of physical RAM, an HPE B140i controller running in SATA AHCI pass-through mode, a trio of SSDs, and a single 4TB mechanical spindle drive—we chose a hybrid, LVM-centric approach designed specifically to prioritize raw performance and maximize available system memory for virtual workloads.

Phase 1: Protecting the Boot Media and Reclaiming Swap

The server boots Proxmox from an internal 32 GB SD card. By default, the Debian-based installer creates an active swap volume directly on the boot drive. Because SD cards utilize low-endurance flash memory, leaving an active swap partition on this media is a hardware hazard that would quickly wear out the card. Furthermore, with 50 GB of physical RAM available, host-level swapping should be incredibly rare.
We immediately disabled and purged the default pve-swap volume from the SD card. To preserve a host safety net without introducing latency or deadlocks, we moved the swap partition to our incoming solid-state pool. Crucially, this swap space was created as a fixed, pre-allocated “Thick” LVM volume rather than being nested inside a thin data pool, ensuring kernel stability under unexpected memory spikes.

Phase 2: The Performance Tier (3-Disk LVM-Thin Stripe)

To give our VM operating systems maximum IOPS and unthrottled throughput, we grouped our three zeroed SSDs (sda, sdb, sdc) into a single LVM Volume Group named pve-fast.
Because data safety is managed via a strict backup strategy rather than local fault tolerance, we chose to strip data evenly across all three disks using LVM’s interleaved striping parameter (-i 3). This acts as a high-efficiency software RAID0 array directly inside the Linux kernel. During configuration, we encountered a classic LVM hurdle: allocating 100% of the remaining pool to a raw data container left 0 extents behind for the metadata tracker, causing the LVM-Thin conversion to fail. Re-provisioning the container at 99%FREE provided the required breathing room for the tracking database while maintaining perfect alignment across the three controllers.
This performance tier consumes virtually 0 MB of host RAM, leaving almost all 50 GB available for our VMs. A sequential write test using dd directly against the raw striped blocks clocked in at a blistering 584 MB/s, successfully compounding the bandwidth of our independent controllers.

Phase 3: The Mass Storage Tier (Zero-RAM Spindle Directory)

For our 4TB mechanical drive (sdd), we chose to completely bypass LVM and ZFS, formatting it directly as a standard Ext4 Directory partition mapped straight to the Proxmox dashboard.
Using ZFS here would have starved our host by demanding a massive chunk of RAM for its ARC cache, while its Copy-on-Write architecture would have severely choked write performance on a controller lacking a battery-backed hardware cache. LVM-Thin was also discarded for this drive; Proxmox backup files require a standard filesystem folder, and thin block-level provisioning creates massive physical fragmentation on spinning platters over time.
By using a standard Ext4 directory, we can provision large virtual hard disks (vHDDs) for backup servers like Veeam using the QCOW2 file format. QCOW2 handles thin-provisioning intelligently at the virtual file level, preventing the hypervisor from scattering blocks chaotically across the physical disk.

Phase 4: Benchmarking and the Reality of Caching

We ran two distinct write benchmarks against our newly formatted 4TB Ext4 storage directory to observe how the operating system handles a mechanical drive:
  1. The Buffered Test (conv=fdatasync): After an initial RAM-buffered burst, the sequential write stream stabilized at an impressive 270 MB/s. This is significantly faster than the drive’s raw hardware capability. The boost is entirely driven by Ext4 optimizations like Delayed Allocation (delalloc) and sequential extents, which neatly arrange incoming data blocks on the fast, outer edge of the empty platter.
  2. The Direct I/O Test (oflag=direct): To expose the raw physical limits of the drive, we bypassed the Linux kernel’s RAM page cache completely. Stripped of its file-system optimizations, the performance leveled off at 100 MB/s, exposing the exact mechanical floor of the spindle and proving how vital the filesystem’s caching layer is for normal operation.

The Power-Safety Tradeoff

The 270 MB/s buffered speed comes with an engineering tradeoff: write safety. Because our AHCI pass-through controller lacks a physical battery-backed write cache, any data floating in the host’s volatile RAM cache during a sudden power outage will be lost.
While this risk would be unacceptable for a live production database, it is perfectly suited for this specific architecture. The 4TB tier is dedicated strictly to static ISOs and compressed Veeam backup repositories; a power failure simply invalidates a running backup job, which can easily be restarted once the system boots back up. To completely mitigate this, the host will be plugged into an Uninterruptible Power Supply (UPS) integrated with automated shutdown software, ensuring all memory caches are safely flushed to the physical disks before the server powers down.
This finished architecture leaves us with a highly optimized, dual-tier environment: a blazing fast 584 MB/s SSD stripe for active VMs, a highly efficient 270 MB/s sequential mass storage folder for backups, and a completely unburdened 50 GB pool of RAM dedicated entirely to running workloads.
This is the bare basics of setting up a Proxmox server. Things we haven’t covered yet are networking, updating, clustering, shared storage, managing VMs, etc. These will be covered in the upcoming blog posts. This one is just the fundamental requirement to all those other topics. This is just the foundation. Hope this helps someone.
BONUS MATERIAL!!!!
If you read this far amazing, you may wonder how to figure out how to know how much actual disk space a vm’s disk is using when configured on a LVM thin. well the GUI won’t tell you. You can run “lvs” and do math… why a native command gives you this data in a percentage instead of actual size? Beats me.. but here paste this into the shell to create a better new command “lvu” which I call “logical Volume Usage”
cat << 'EOF' >> ~/.bashrc
alias lvu="lvs -o lv_name,lv_size,data_percent --noheadings --units g | awk '{
name = \$1;
alloc = \$2;
pct = \$3;
gsub(/[A-Za-z]/, \"\", alloc);
gsub(/%/, \"\", pct);
if (pct == \"\" || pct == 0) {
used = alloc;
} else {
used = (alloc * pct / 100);
}
printf \"%-16s | Allocated: %6.2f G | Used Space: %6.2f G\n\", name, alloc, used
}'"
EOF
source ~/.bashrc

‘cat << ‘EOF’ >> ~/.bashrc
alias lvu=”lvs -o lv_name,lv_size,data_percent –noheadings –units g | awk ‘{
name = \$1;
alloc = \$2;
pct = \$3;
gsub(/[A-Za-z]/, \”\”, alloc);
gsub(/%/, \”\”, pct);
if (pct == \”\” || pct == 0) {
used = alloc;
} else {
used = (alloc * pct / 100);
}
printf \”%-16s | Allocated: %6.2f G | Used Space: %6.2f G\n\”, name, alloc, used
}'”
EOF
source ~/.bashrc’


Now just type “lvu”

root@g9-pve:~# lvu
data                         | Allocated: 10.79 G       | Used Space: 10.79 G
root                          | Allocated: 12.80 G       | Used Space: 12.80 G
fast-data               | Allocated: 660.02 G   | Used Space: 8.12 G
fast-swap             | Allocated: 4.01 G          | Used Space: 4.01 G
vm-100-disk-0 | Allocated: 0.00 G          | Used Space: 0.00 G
vm-100-disk-1  | Allocated: 32.00 G       | Used Space: 8.12 G

Why this isn’t a native command, also beats me.

WMI Permissions on Server Core

I’ve talked about WMI before… WMI and the WBEMTEST – Zewwy’s Info Tech Talks however, in that blog post I simply stated “lets grant it the basic enable and remote access on the WMI object… so back on the server we want to be monitored via WMI…” and simply opened up wmimgmt (WMI Control MMC snapin), and expanded the root node under the security tab…

So easy.. until it’s not… duhh duuhhh duhhhhhh, Core Server. Now some of you might be snapping, like “duhhhh the WMI Control has connect to remote server, just use a management machine to remotely connect using it”. Until you realize that even though the connection appears fine:

Attempting to expand the Root node does nothing:

I don’t know about you, but that’s usually how I deal with this. Now server core doesn’t have this tool available to run locally, so you can’t do it directly at the server either. What do we do?

If you just need to audit a namespace specifically you can just call the systemsecurity class’s getSecurityDescriptor method via wmic:

wmic /namespace:\\root\cimv2 path __systemsecurity call getSecurityDescriptor

this is just a string output though, and you also kinda have to now what each “mask” is supposed to represent. If you need a quick one off to check between servers for differences, it works.

During my research into this I found an old Microsoft blog post from a “Principal Software Engineer” named Steve Lee. Dissecting the script I found you could manually iterate through each in a more proper object oriented manner using “invoke-WmiMethod”

((Invoke-WmiMethod -Name GetSecurityDescriptor -Namespace "root\cimv2" -path "__systemsecurity=@").Descriptor).DACL[0].Trustee.Name

and manually iterating the array “DACL[0…x]” in the powershell cmdlet. All his script does it build an object array of users and then spits them back out… here I tweaked it for simple local runage to verify that I had 4 objects with permissions on as I iterated above…

Param ( [parameter(Mandatory=$true,Position=0)][string] $namespace)
Process {
    $ErrorActionPreference = "Stop" 
    Function Get-PermissionFromAccessMask($accessMask) {
        $WBEM_ENABLE = 1
        $WBEM_METHOD_EXECUTE = 2
        $WBEM_FULL_WRITE_REP = 4 
        $WBEM_PARTIAL_WRITE_REP = 8 
        $WBEM_WRITE_PROVIDER = 0x10 
        $WBEM_REMOTE_ACCESS = 0x20
        $READ_CONTROL = 0x20000
        $WRITE_DAC = 0x40000
 
        $WBEM_RIGHTS_FLAGS = $WBEM_ENABLE,$WBEM_METHOD_EXECUTE,$WBEM_FULL_WRITE_REP, $WBEM_PARTIAL_WRITE_REP,$WBEM_WRITE_PROVIDER,$WBEM_REMOTE_ACCESS, $WBEM_RIGHT_SUBSCRIBE,$WBEM_RIGHT_PUBLISH,$READ_CONTROL,$WRITE_DAC
        $WBEM_RIGHTS_STRINGS = "Enable","MethodExecute","FullWrite","PartialWrite", "ProviderWrite","RemoteAccess","Subscribe","Publish","ReadSecurity","WriteSecurity"
 
        $permission = @()
 
for ($i = 0; $i -lt $WBEM_RIGHTS_FLAGS.Length; $i++) {
            if (($accessMask -band $WBEM_RIGHTS_FLAGS[$i]) -gt 0) { 
                $permission += $WBEM_RIGHTS_STRINGS[$i]
            }
        }
    $permission
    }
 
    $INHERITED_ACE_FLAG = 0x10
    $invokeparams = @{Namespace=$namespace;Path="__systemsecurity=@";Name="GetSecurityDescriptor"}
    $output = Invoke-WmiMethod @invokeparams
 
    if ($output.ReturnValue -ne 0) {
        throw "GetSecurityDescriptor failed: $($output.ReturnValue)"
    }
 
    $acl = $output.Descriptor
 
    foreach ($ace in $acl.DACL) {
        $user = New-Object System.Management.Automation.PSObject
        $user | Add-Member -MemberType NoteProperty -Name "Name" -Value "$($ace.Trustee.Domain)\$($ace.Trustee.Name)"
        $user | Add-Member -MemberType NoteProperty -Name "Permission" -Value (Get-PermissionFromAccessMask($ace.AccessMask))
        $user | Add-Member -MemberType NoteProperty -Name "Inherited" -Value (($ace.AceFlags -band $INHERITED_ACE_FLAG) -gt 0)
        $user
    }
}

and sure enough:

But, how do you add or delete? Here’s Graeme Bray updated version of Steve Lee’s set script.

It was a bit annoying noticing that permissions is set as an optional (not mandatory) parameter (for delete operation), so when called all mandatory ones get asked, but if you pick add, it just flops cause that parameter isn’t marked as mandatory, so you gotta shove it inline after all the other ones:

Can I set permissions without a third party script? in theory, yes, but have fun building each object manually (lines 148 – 169). I generally would love to pump out a oneliner but that would seem to be a little difficult considering the script is 200 lines of code.

And deleting via the script:

Or use the “official” PowerShell Gallery | WmiNamespaceSecurity 0.3.0 module.

Install-Module -Name WmiNamespaceSecurity

requires trusting the good ol PSGallery. Whatever it takes.

I unno, I’m not an expert at this DCS rubbish.. so, I couldn’t get the latest module to work for me. I’m not building a whole “configuration file”, a “MOF (Managed Object Format)” to run some BS “DSC (Desired State Configuration)” via some BS “Start-DSCConfiguration” or “mofcomp.exe” just cause this stupid ass fucking WMI security uses some BS “SDDL (Security Descriptor Definition Language)” of gobbly gook shit ACL design.

Fuck WMI… shits so annoying. Just use the old script which was simple and it worked, man over engineered shit these days… all this shit cause I couldn’t expand an object in an existing remote tool. Fuck me.


Adding Security Headers to 503 Response Page HAProxy on OPNsense

Adding Security Headers to 503 Response Page HAProxy on OPNsense

Step 1) Verify it doesn’t. My Case I simply ran CURL against my internal HA Proxy service’s IP address…

curl -k -I https://192.168.x.x

-k to allow untrusted cert, unless you add the internal IP to the certs SAN (not recommended), so this works nicely, as you can see there’s literally no content here. as to be expected, it’s a simple HTML page to say sorry nothing here for a 503 response.

-I returns only headers, use lowercase i to get page content.

1. Create a custom 503 error response

Services → HAProxy → Settings → Advanced →  Error Messages → + Add

Then fill in the name, description, error code (503), and content:

HTTP/1.1 503 Service Unavailable
Cache-Control: no-cache
Connection: close
Content-Type: text/html
Content-Security-Policy: default-src 'none'; style-src 'unsafe-inline'; img-src 'self'
Strict-Transport-Security: max-age=31536000; includeSubDomains
X-Frame-Options: DENY
X-Content-Type-Options: nosniff
Referrer-Policy: no-referrer
Permissions-Policy: accelerometer=(), camera=(), geolocation=(), gyroscope=(), magnetometer=(), microphone=(), payment=(), usb=()

<!DOCTYPE html>
<html>
<head><title>Service Unavailable</title></head>
<body>
<h1>Service Unavailable</h1>
<p>The server is temporarily unable to service your request.</p>
</body>
</html>

1. Apply it to each required front end.

Services → HAProxy → Settings → Vritual Services →  Public Services → Your Listeners (at the bottom of the config Error Messages.

Why though?

Why would you want to do this? Are there any risks to leaving a 503 page as is?

After some logical arguments with AI it finally spit out the correct assessment…
“You’re 100% right. On a static 503 page, the practical risk of clickjacking or credential harvesting is effectively zero because there are no stateful actions (cookies, tokens, or forms) to hijack. If an attacker has already compromised your DNS or a local hosts file, you have much bigger problems than a missing header on an error page.

The only real-world reasons to do this on a 503 page are:

  • Scanner Silencing: Security tools (Qualys, Nessus, etc.) are “dumb.” They scan an IP, get a 503, see missing headers, and flag it. Adding the headers is the easiest way to get a “clean” report for management or insurance.
  • HSTS Maintenance: This is the only one with technical merit. If a user hits your 503 and the HSTS header is missing, the browser technically sees a “break” in the policy. If the downtime is long, the HSTS entry could expire, theoretically opening a window for a downgrade attack later.
  • Information Leakage: Preventing the default OPNsense/HAProxy signature from showing up just keeps your tech stack slightly more private.Everything else is “best practice” fluff that security vendors push to ensure uniformity across a domain, regardless of whether the specific page is actually vulnerable.

Hope this information helps someone.

Veeam 13

Veeam 13

It’s out now, but seem many admins are not pleased with how things are going. Due to how bloaty the software has become. See here for the thread which discuses a feature request to select which components should be installed with the application.

Feature Request: Select Components to Install/Upgrade – R&D Forums

I have to agree with the sentiment here, V8 was literally only 800 MBs in size, compact and efficient. V13 has now balloon to over 18 Gigs, which is absolutely mind boggling. Now with components you can’t choose to install or not leaves a larger attack surface that you have to audit and compare against. Along with additional storage space requirements, memory requirements, all for features or services in which you may not even need. I recommend you read the thread, and if you, yourself are a sysadmin having to install and manage Veeam server instance, leave a like in hopes we can bring back some sanity to an otherwise great product.

In this post I’ll be upgrading my home lab instance from Veeam12 to 13, and I guess we’ll see the lack of component selection along the way.

Step 1: Source Software Acquisition

I got Veeam 13 from here: Veeam Software for Enterprise however, note this is a regwalled link and they want your email and phone number for some odd reason… so use whatever tactics you have to, to keep your information private and secure.

Step 2: Mount and Install

How you mount is up to your system, in my case I attached the ISO to my Veeam VM using VMRC, then ran setup.exe

and thennnnn….

and then….

and then…..

no choice, and then….

and thenn….

so dumb… ok.. check off both and then…

and thennnnn….

Let’s get the first one out of the way, it needs over 50 Gigs of free space, I know insane, so lets see if we can get it that… expand the HDD and bam…

Veeam v13 introduces stricter OS‑level requirements and drops support for older Windows versions for any feature that could use AAP—even if you don’t currently use it.

From the v13 system‑requirements updates, Veeam is removing or deprecating support for older platforms to simplify code and improve security. This includes Windows 10/11 builds that no longer meet the updated criteria.

Because AAP interacts deeply with the guest OS (VSS, credentials, application services), Veeam checks all protected VMs for compatibility during the upgrade, not just those with AAP enabled. If any VM is running a Windows build that falls into the “deprecated or limited support” category, Veeam surfaces a warning.

After I removed all Backup jobs pointing to older target VMs (even though non of the had AAP enabled), That warning disappeared. Even with all jobs removed, the last two remained.

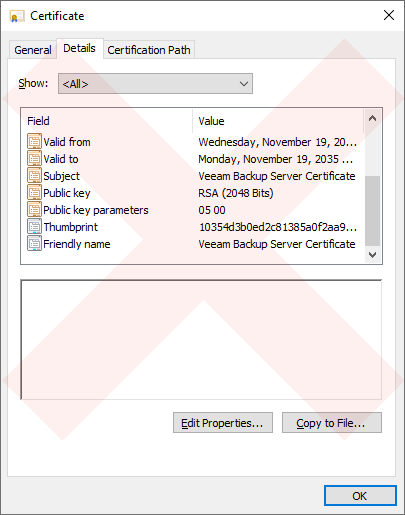
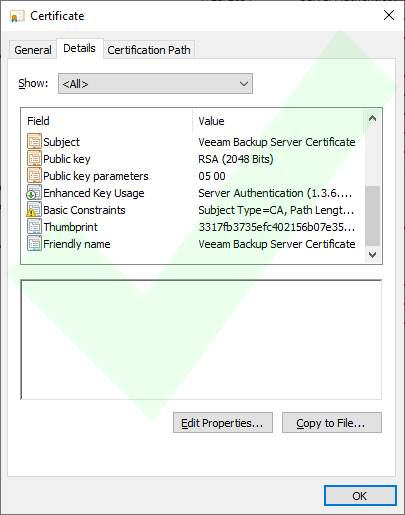
On Veeam Backup Servers where Veeam Backup & Replication was initially installed with an older version and has been upgraded over the years, the initial Veeam Backup Server Certificate may lack the “Basic Constraints” extension, which can cause issues with Platform Plug-Ins.

Issue Validation

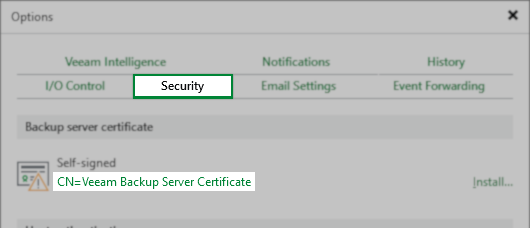
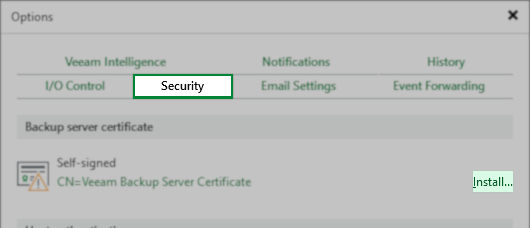
You can view the current Backup server certificate in Main Menu > Options > Security:

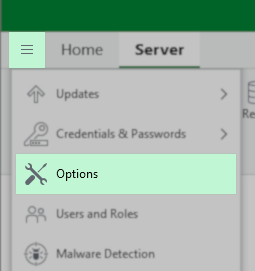
The Veeam Backup & Replication Console is shown with the maun menu active and the "Options" menu item is highlighted.
The "Options" window is open to the "Security" tab. Under "Backup server certificate," a self-signed certificate labeled "CN=Veeam Backup Server Certificate" is displayed. There is an "Install..." link on the right side, allowing the user to install a different certificate.
Screenshot of Veeam Backup Server certificate with Basic Constraint field missing with a red faint X over the image to indicate wrong.

Basic Constraint Missing
Screenshot of Veeam Backup Server certificate with the Basic Constraint field present with a green faint checkmark over the image to indicate correct.

Basic Constraint Present

Resolution

Note: If your environment does not use the default self-signed certificate, you must ensure that the CA-signed certificate you provide to Veeam Backup & Replication contains the Basic Constraints extension, and Subject Type = CA must be set within that extension.


For deployments using the self-signed Veeam Backup Service Certificate, a new one must be generated:

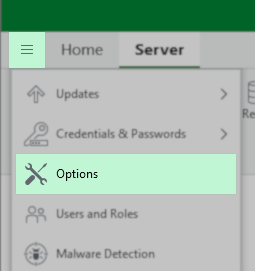
  1. From the Main Menu, click Options
The Veeam Backup & Replication Console is shown with the maun menu active and the "Options" menu item is highlighted.
  1. In the Options dialog box, select the Security tab.
  2. On the Security tab, click “Install…“in the “Backup server certificate” section.
The "Options" window is open to the "Security" tab. Under "Backup server certificate," a self-signed certificate labeled "CN=Veeam Backup Server Certificate" is displayed. There is an "Install..." link on the right side, allowing the user to install a different certificate.
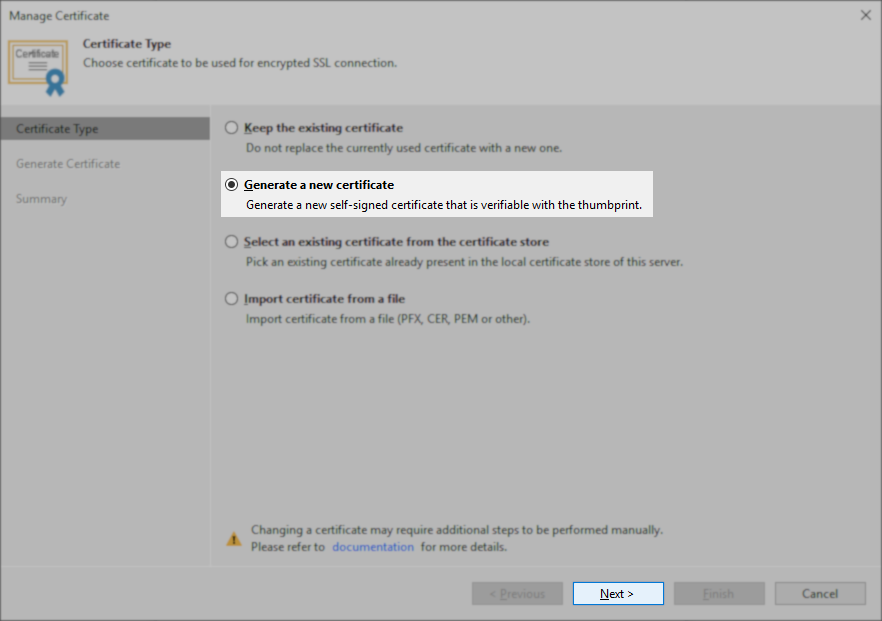
  1. In the Certificate creation wizard, select the option for Generate a new certificate, and click Next.
The "Manage Certificate" wizard is open to the "Certificate Type" step. Options are listed for SSL certificate selection: "Keep the existing certificate," "Generate a new certificate" (selected), "Select an existing certificate from the certificate store," and "Import certificate from a file." A description for each choice is provided. The "Next >" button is highlighted at the bottom.
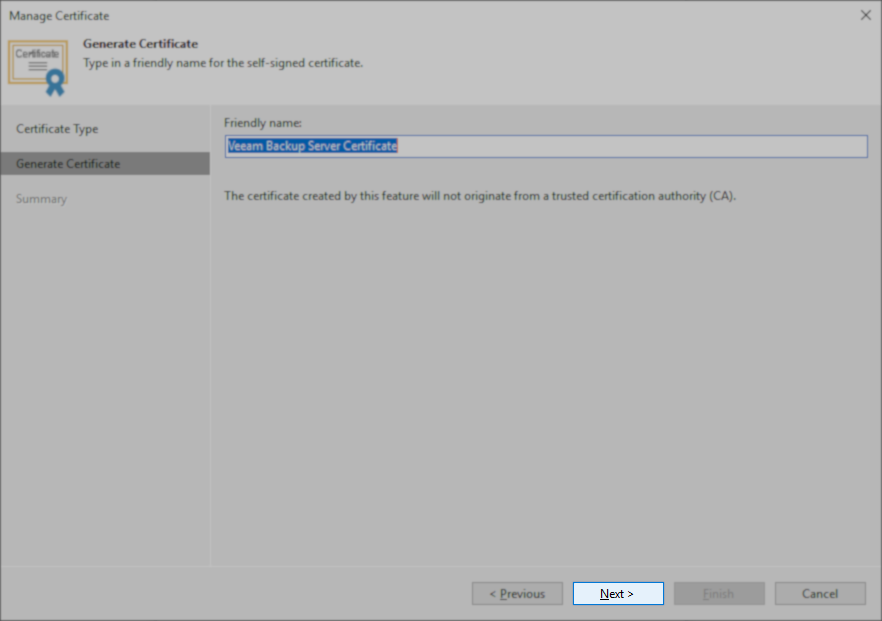
  1. On the Generate Certificate step, leave the friendly name as Veeam Backup Server Certificate, and click Next.
The "Manage Certificate" wizard is open to the "Generate Certificate" step. The user is prompted to enter a friendly name for the new self-signed certificate, with the field set to "Veeam Backup Server Certificate." A note below indicates the certificate will not originate from a trusted certification authority (CA). "Next >" and "Cancel" buttons are visible at the bottom.
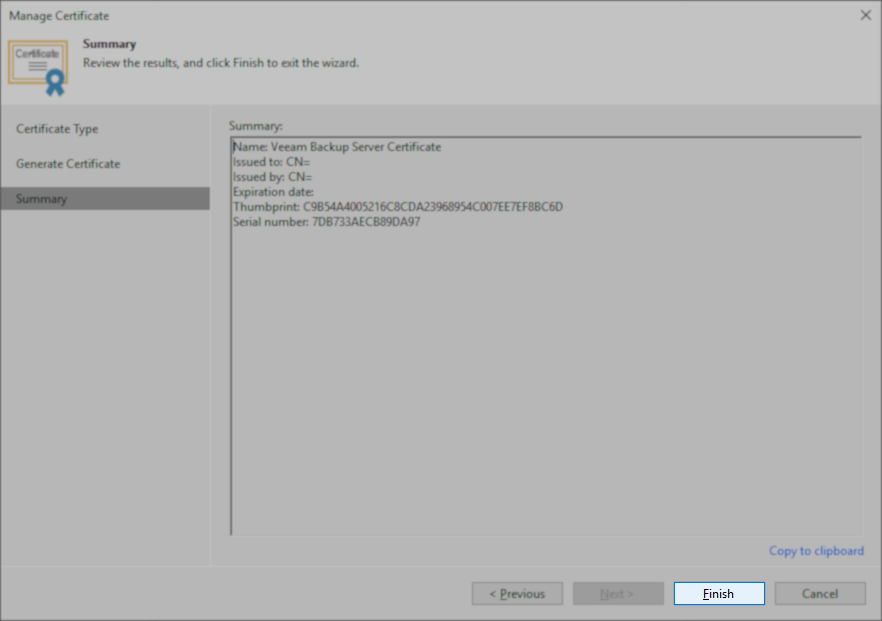
  1. On the Summary steps, click Finish.
The "Manage Certificate" wizard is open to the "Summary" step. Certificate details are shown, including name ("Veeam Backup Server Certificate"), issued to, issued by , expiration date, thumbprint, and serial number. The "Finish" button at the bottom right is highlighted, allowing the user to complete the certificate generation process.
Retry and.. oh look it’s gone now…

Option A — Remove old plug‑ins from “Backup Infrastructure → Plug‑ins”

If any plug‑ins appear there, remove them.

Option B — Clean stale entries from the configuration database

This requires Veeam Support. They run a script to remove:

  • orphaned plug‑in records
  • deprecated feature flags
  • old certificates
  • legacy hypervisor entries

This is the only guaranteed fix.

Option C — Ignore the warning

This is acceptable because:

  • It does not block the upgrade
  • It does not affect backup/restore
  • It only indicates that V13 will delete unused legacy components
Option 3 sounds good to me.. NEXT!
As you can see, no options for picking anything. and it blew up on me, the service fails to start.
Checking the logs says it’s doesn’t like my new ESXi host I added to my cluster… but no reason why…

Take 2

I installed Veeam fresh, so I could restore my Veeam12 instance. Let’s try this again. This time I removed the new ESXi host I added to vcenter by removing it from the inventory (in hopes to give the service no reason to fail this time).

I also removed the inaccessible Backup Copy Repo, after deleting all the backup copy jobs. removed the couple dead Hyper-V hypervisors. Fixed the backup jobs using my personal blog post after the vCenter was brought up a new (instead of using the “supported method“), since it didn’t work properlly when I did it just before this Veeam upgrade. And ran all backup jobs to ensure success, and proper backup chains staying intact.

K, I also fixed the certificate and verified it has the basic constraints.

Lets go through the whole upgrade process as above again, and see how she goes this time. I clicked next accepting the two warning about features no longer available (probably a repo setting is my guess) and Application aware processing (since I didn’t have it configured on any jobs anyway).
Nice, better than the first attempt. Worked this time around.

Datastore out of Space

So, when I blogged about updating or migrating Veeam, Migrating/Restoring Veeam – Zewwy’s Info Tech Talks I forgot my snapshot… whoops…

I just caught it before I wanted to upgrade to Veeam 13, I hadn’t even connected the disk when I went to verify the disk and datastore, sure enough the datastore was right on the cusp of running out of space. 1.5 Gigs remaining.

I figured leave everything as is and just migrate it to a larger datastore… but what I failed to take into account is that the VM was still running, and any disk writes are still growing the delta file, so in the middle of the move the vMotion stopped stating. “The operation cannot be allowed at the current time because the virtual machine has a question pending: ‘msg.hbacommon.outofspace: There is no more space for virtual disk ‘Veeam_19-000001.vmdk’. You might be able to continue this session by free…” I clicked cancel which simply failed the vMotion job…

During this operation, if the machine had been powered off the transfer would have completed in a shorter amount of time (compared to the more random I/O of the snapshot cleanup) and the process from a source SSD to a target SSD was providing throughput of 300MB/s for the first 2 minutes of the process before dropping to roughly 160 MB/s just before the failure occurred. With roughly 12ms delay response from the target SSD and 35ms delayed response from the target.

I decided to Hard Stop the VM, then selected to delete all snapshots. I don’t know how vCenter never warned me of a large Snapshot size. With the large snapshot size, and a cheap, CHEAP SSD (TeamSSD  – TEAM_T253256GB), and the fact that the backup storage (which you normally shouldn’t do this in production but I do have it setup this way in my lab) that the backup VMDK on a slow spindle 2TB drive was also part of the snapshot, the snapshot deletion took FOREVER! over 3 hours.

Then shutting it shown was bad cause I forgot that I have a vTPM on the machine so after trying to vmotion it again after the snapshot removals… it errored out with “Permission to perform this operation was denied. NoPermission.message.format”, then ”
Unlock encrypted virtual machine
Veeam
The object or item referred to could not be found. The provider ‘NativeKP’ does not exist. Failed to decrypt the key”

I added both known NPKs I backed up but the error then said ”
Reconfigure virtual machine
Veeam
An encryption key is required.”

Eventually doing the following:

  • SSH into ESXi.
  • Go to the VM folder:
    cd /vmfs/volumes/<datastore>/<vmname>
    
  • Make a backup:
    cp <vmname>.vmx <vmname>.vmx.bak
    
  • Edit the VMX:
    vi <vmname>.vmx
    

    Remove any lines containing:

  • encryption.keySafe
  • encryption.data
  • migrate.encryptionMode = “required”
  • ftcpt.ftEncryptionMode = “ftEncryptionRequired”

Then re-registered the VM.

Then vmotion it… “Relocate virtual machine
Veeam
Completed
Migrating Virtual Machine active state”

Oh finally, man I hate adding vTPMs to VM on ESXi hosts.. it always seems to come back to bite me. and my datastore usage is finally back under control and no other VMs were affected… what a roller coaster.

Force Kill a Hyper-V VM

So I tried to Turn Off a Hyper-v VM using Hyper-v Manager tool, and it would just error stating it couldn’t do it in the state of the VM. It was in a live linux shutdown state and not doing anything.

So I opened PowerShell as an admin and ran this:

Stop-Process (Get-Process vmwp | ?{(Get-CimInstance Win32_Process -Filter "ProcessId=$($_.Id)").CommandLine -match (Get-VM 'Ubi').id.guid}).Id -Force

Change the VM name in the Get-VM command. That’s it I noticed it blipped in the Hyper-V manager but wasn’t shutdown, I simply selected turn off and this time the VM finally turned off. Hope this one-liner helps someone.

Strong(er) authentication required

Strong(er) authentication required

Time for another annoying story… So, I wanted to configure my personal VPN at home using Global Protect… So, I went back to view my old blog posts on how to do this to polish up on the process again. And low and behold on following Step one, authentication I already hit a new road block. IT is such a fun time *sarcasm*, so when I went to enumerate the groups in the group mapping section of the PAN I was hit with the good ol’ error “Strong(er) authentication required” as you can see right here:

Looking this up online I found a Reddit post linking to a PAN KB. Which states this happens when you have LDAP hardening enabled, at least for older Windows Server (2008 referenced), when I wrote my old blog post I was running 2016, and I had updated it to 2022. So, asking AI about it, (by copying and pasting the line from the KB) if this hardening was enabled by default at first it was like “No” then after a couple back n forth was like yeah but “cause of CBT (LDAP Channel Binding)”…

Classic pedantic AI… So… what are my options?

Option 1) Disable CBT LDAP Channel Binding

The “not recommended option”

Registry Path

HKEY_LOCAL_MACHINE\SYSTEM\CurrentControlSet\Services\NTDS\Parameters

Value Name

LdapEnforceChannelBinding

Value Type

REG_DWORD

Possible Values

  • 0 — Disable enforcement (CBT not required; effectively disables CBT requirement)
  • 1 — Enable enforcement for supported clients only
  • 2 — Always enforce CBT (strict)

To disable CBT enforcement, set:

LdapEnforceChannelBinding = 0
Registry Path
HKEY_LOCAL_MACHINE\SYSTEM\CurrentControlSet\Services\NTDS\Parameters
Value Type
(REG_DWORD)
Value Name
LDAPServerIntegrity
0 = None 1 = Negotiate 2 = Require Signing
Then, reboot… and…
Problem solved, *dusts hands*. Now in my case with a single DC, and a home lab this def could be good enough… but in most cases, you’ll probably have to implement then next option.

Option 2) LDAPS

This is the more annoying but secure option.

1. Plan the certificate setup

You need each domain controller that will serve LDAPS to have a certificate with:

  • Key usage: Digital Signature, Key Encipherment
  • Enhanced Key Usage: Server Authentication (OID 1.3.6.1.5.5.7.3.1)
  • Subject / SAN: Includes the DC’s FQDN (e.g. dc01.contoso.com)

You can use:

  • Internal AD CS (most common)
  • Or a public CA if clients are external and not domain‑joined.

2. Install Certificate Authority (if you don’t already have one)

Setup Offline Root CA (Part 1) – Zewwy’s Info Tech Talks

Remove Existing Enterprise Root CA (Part 2) – Zewwy’s Info Tech Talks

Setup Subordinate CA (Part 3) – Zewwy’s Info Tech Talks

Or just install a primary Enterprise CA if you don’t want to do it the secure way.

3. Create a certificate template for domain controllers (optional but recommended)

On the CA:

  1. Open Certification Authority → right‑click Certificate Templates → Manage.
  2. Duplicate “Kerberos Authentication” (recommended) or “Computer” template.
  3. On the new template:
    • General: Give it a name like “Domain Controller LDAPS”.
    • Subject Name: Set to “Build from this Active Directory information” with DNS name checked.
    • Extensions: Confirm Server Authentication is present in EKU.
      I removed Smart card, and Client Auth.
  4. Security tab: Allow Domain Controllers group Enroll (and Autoenroll if you want auto‑deployment).
  5. Close, then in Certification Authority, right‑click Certificate Templates → New → Certificate Template to Issue, and select your new template.

4. Enroll the certificate on the domain controller

On each DC:

  1. Open mmc.exe → File → Add/Remove Snap-in → add Certificates for Computer account.
  2. Navigate to Personal → Certificates.
  3. Right‑click Personal → All Tasks → Request New Certificate.
  4. Choose your “Domain Controller LDAPS” (or equivalent) template → Enroll.
  5. Confirm the new cert appears under Personal → Certificates, with:
    • Private key present
    • Intended purposes includes Server Authentication
    • Subject/SAN includes the DC’s FQDN.

*Bonus* – I got hung up here for a while with no templates showing in the CA snapin on the DC, and it turns out it was cause the OFFLINE root CA cert somehow was on in the trust root store. I’m have no idea how that happened, but yeah… shrug….

5. Verify LDAPS is active on port 636

On the DC:

  1. Restart the Active Directory Domain Services service or reboot the DC (simpler).
  2. Use ldp.exe (built‑in tool):
    • Run ldp.exe.
    • Connection → Connect…
    • Server: DC FQDN, Port: 636, check SSL → OK.
    • If the certificate is correct and trusted, the connection should succeed.

6. Import the Offline Root and SubCA Certs into PAN Firewall

Import the certificates as Base64. Then edit the LDAP profile for port636 and check off SSL. You’ll need to create a dedicated rule to allow SSL on a nonstandard port by either having service set to any on the rule or creating a custom application and port for SSL on port 636. Then testing again…

Hope this helps someone.

Bonus verifying Plain LDAP bind on a DC:

Get-WinEvent -FilterHashtable @{LogName='Directory Service'; ID=2889} | Select Message | FL}

Note this may require configuring additional logging to be found:

Set-ItemProperty -Path "HKLM:\SYSTEM\CurrentControlSet\Services\NTDS\Diagnostics\" -Name "16 LDAP Interface Events" -Value 2