Migrating Veeam as a VMware VM to a Proxmox VM

Running Veeam as a Windows VM on Proxmox VE

With Broadcom completely upending the virtualization landscape, like many admins, I’ve been heavily evaluating Proxmox VE (PVE) as a viable enterprise alternative. While Veeam now natively supports PVE, I wanted to see what happens when you run the Veeam Backup & Replication (VBR) server as a Windows VM hosted directly on a PVE node, rather than on dedicated hardware.
Here is the technical reality of this architecture, the hypervisor mechanics, and the exact step-by-step process I used to execute a zero-duplication migration from ESXi into a tight local LVM-Thin storage layout.

1. The Core Architecture: How VBR Operates Inside PVE

When I deployed VBR into a Windows VM on Proxmox, the fundamental architecture shifted away from what I was used to in the VMware world:
  • The VBR VM is just the brain: The Windows VM hosting Veeam acts strictly as the management plane, controlling schedules, maintaining the PostgreSQL database, and exposing the console.
    – Works the same way as a VMware VM, it just can’t act as it’s own VMware hotadd node when on PVE VM
  • The PVE Worker handles the heavy lifting: Because PVE lacks a monolithic management layer like vCenter, Veeam requires me to add each individual node in the cluster to the console. Veeam then provisions a lightweight, Linux-based Worker VM onto each host to act as a stateless data mover.
  • The Control vs. Data Paths: When a job triggers, my Windows VBR VM talks directly to the Proxmox API to initiate a hypervisor-level snapshot. Once the snapshot is ready, VBR instructs the local Worker VM to mount that snapshot, compress the data blocks, and stream them directly to my backup repository.
                  ┌─── [ Veeam VBR Server (Windows) ] ───┐
                  │                                      │
                  ▼ (1. Orders Snapshot via API)         ▼ (3. Orders Data Processing)
       [ Proxmox VE Host ]                       [ Veeam PVE Worker VM ]
                  │                                      │
                  ▼ (2. Triggers Quiescing)              │
       [ Target VM + QEMU Agent ]                        │
                  │                                      │
                  └─────── (4. Reads Snapshot Data) ─────┘

2. Technical Friction Points & Lessons Learned

While the setup works, moving from ESXi to PVE exposed several architectural limitations and maturity gaps that I had to account for.
The Infuriating VLAN Blind Spot in the Worker Wizard
This is one of the clearest signs that Veeam’s Proxmox integration is still green. When deploying the Linux-based Worker VMs across my cluster nodes, the Veeam Deployment Wizard lacks any field to define a VLAN ID. It lets me select the network bridge (e.g., vmbr0), but that’s it.

  • The Hack: Because my management network is VLAN-tagged, the newly deployed Worker VMs immediately drop offline upon creation because they can’t get an IP address. I have to manually jump into the Proxmox GUI, open the hardware settings of the newly provisioned Worker VM, inject the VLAN tag into its virtual NIC, and reboot it.
  • The Catch: Every time Veeam pushes an update that redeploys or patches these Worker VMs, this manual configuration gets wiped out. It requires immediate administrative intervention in the PVE GUI to fix the network interfaces after every lifecycle update.

3. The Migration Strategy: Zero-Duplication Streaming to LVM-Thin

Moving my Veeam server presented a unique chicken-and-egg problem. To make matters worse, my old ESXi lab layout was messy: my Veeam backup repository wasn’t an independent iSCSI target—it was a raw, bloated 1.2 TiB VMDK sitting directly on local mechanical spindle datastores.
To avoid the pain of building a fresh Windows OS, configuring IPs, and rebuilding my environment from scratch, I chose to use the Self-Backup and Restore method. I backed up just the C: drive of the Veeam VM, restored it to Proxmox, and brought the compute layer online.
However, migrating that massive data disk into a tight, local LVM-Thin pool presented a storage Catch-22: LVM-Thin does not use files like VMDK or QCOW2. It is a block-level storage architecture. I couldn’t just copy the file over first because my PVE host had no local path large enough to store a temporary 1.2 TiB file.
To bypass this hurdle and ensure zero file duplication, I streamed the conversion directly over the network from the ESXi host using the command line. Which involves adding the ESXi host to PVE, then using PVEs CLI.

Phase 1: Pre-Migration Trim (Dropping the Bloat)

Inside the Windows Veeam VM, the OS reported only 600GB of actual data in use, meaning I had over 200GB of “ghost bloat” on the 808GB allocated ESXi VMDK. Before shutting down the VM, I ran a quick optimization check to ensure Windows explicitly issued zero-discard commands to the hypervisor:
powershell
Optimize-Volume -DriveLetter D -Defrag -Verbose
 Optimize-Volume -DriveLetter D -ReTrim -Verbose
(After trimming, my actual active file space dropped to exactly 519 GB).

Phase 2: Live Network Streaming via qm importdisk

When you add an ESXi storage provider to Proxmox, PVE transparently maps the remote files to a hidden local runtime directory on the PVE host. This allows you to target the file directly with native Proxmox CLI utilities without copying anything locally.
Add ESXi Storage:

  • Log in to the Proxmox Web UI.
  • Go to Datacenter > Storage > Add and select ESXi.
  • Enter a unique ID, your ESXi host Server IP/hostname, and your ESXi administrator Username and Password.
  • Check Skip Certificate Verification if your ESXi node uses a self-signed certificate.
  • Click Add.
I created a dummy placeholder virtual disk shell on my newly restored Proxmox Veeam VM (let’s assume VM ID 108), hopped into the Proxmox CLI, and initiated a fileless stream:
qm importdisk 108 /run/pve/import/esxi/desktopesxi/mnt/ha-datacenter/Desktop-2TB/Veeam/Veeam.vmdk msiNM620

Beating the Scary LVM-Thin Warnings
During the transfer, Proxmox threw a terrifying set of warnings:
WARNING: Sum of all thin volume sizes (<1.53 TiB) exceeds the size of thin pool nvme-nm620/nvme-nm620 and the size of whole volume group (<953.87 GiB).
Because the 1.2 TiB virtual boundary of the VMDK was larger than my physical 953 GiB NVMe drive, LVM-Thin immediately flagged that I was overprovisioning.
However, because we trimmed the drive beforehand, the qm importdisk zero-detection engine kicked in. As the empty space traveled over the LAN, the engine detected the logical zeros and completely dropped them instead of writing them to disk.
The progress bar crept through the full 1.2 TiB virtual structure, but it stopped consuming physical blocks when it hit empty space. It finished flawlessly at 100%, consuming an exact physical footprint of 518.88 GB on my NVMe pool—matching my source data perfectly without a single byte of temporary file bloat.

4. The Finish Line

To wrap up the migration, I executed the final hookups:
  1. Attach the Block Storage: Inside the PVE GUI for VM 108, I went to Hardware, double-clicked the newly created Unused Disk, set it to SCSI, and checked the Discard box (ensuring that future Veeam deletions will actively reclaim space on my LVM-Thin pool).
  2. Mount the ISO & Fix the NIC: Because the restored Windows VM lacked KVM network drivers, it booted up offline. I used scp to copy the virtio-win.iso from my other cluster node over to this host’s local directory (/var/lib/vz/template/iso/), mounted it to the VM’s virtual CD drive, opened Device Manager, and updated the Ethernet Controller driver.
  3. Rescan & Run: I brought the data disk Online in Windows Disk Management (which instantly recognized the original NTFS/ReFS structure perfectly), opened the Veeam console, and ran a Repository Rescan.
Within minutes, Veeam mapped my existing backup chains, and my entire infrastructure was fully functional on Proxmox VE with zero data loss and zero configuration rebuilding.
This was nice but I didn’t move the backup data to a dedicated block level storage, did I… No… will I… mhmmm maybe eventually, but I’m surprised how well the conversation went, another step to a VMware -> PVE migration. Also, the backup jobs moved from hotadd to NBD cause the Veeam server is not longer on a ESXi host. And you can’t map a backup set when re-adding a backup job sourcing a PVE host.

BONUS

When I tried running a Full VM Restore from my VMware backups directly onto an LVMthin pool on my high-speed SSD. The restore immediately cratered to a miserable 3 MB/s, pinning my host at a massive iowait percentage. Same problem in my previous blog post when I migrated my email server.
When I cancelled the job in Veeam, the console said “Failed,” but the helper VM refused to die, and the host remained completely paralyzed. Even running a basic Linux sync command via SSH completely hung and stole my terminal shell.
Here is the juicy reality of what happened under the hood:
  • The Block-Level Choke: Veeam streams raw, unallocated data blocks during standard restores. On an un-provisioned LVMthin target, this forces the Proxmox host to perform real-time metadata lookups and extend block structures on every single write loop. This created a massive write-amplification loop that totally choked the SSD controller queue.

  • The Unkillable “D-State”: Hard-killing the VM mid-stream locked the dm-thin kernel driver into an uninterruptible sleep state (Linux D-state). Because the storage layer was frozen waiting on hardware, the kernel completely ignored standard ACPI shutdown signals.
How I broken it loose without pulling the physical power cord:
With the storage layer totally unresponsive and sync frozen, standard reboot commands were completely useless. I had to open a secondary SSH shell and talk directly to the Linux kernel using aggressive, low-level emergency triggers.
First, I enabled the kernel’s magic SysRq interface:
echo 1 > /proc/sys/kernel/sysrq
Then, I sent the emergency hardware reboot signal (b):
bash
echo b > /proc/sysrq-trigger

This acted as a software-level reset button, forcing the motherboard to instantly reboot without trying to unmount or flush the corrupted, frozen storage queues. On startup, the LVMthin subsystem automatically repaired its metadata boundaries and the host came back up healthy.
I found restoring to the same SSD configured as a DIR Ext4 storage had to problem and restored the VM in 5 minutes. So, not sure how to properly handle a Veeam restore to a LVM-thin without having this problem.

Backing up an LXC with Veeam

Backing up an LXC with Veeam

If you use Proxmox VE, you already know how amazing and lightweight Linux Containers (LXCs) are. So, when Veeam announced native support for Proxmox VE, I was incredibly excited. But my excitement turned to pure frustration when I realized a major catch: Veeam’s native Proxmox plug-in completely ignores LXC containers. It only supports QEMU/KVM virtual machines.
Veeam justifies this by saying enterprise workflows rely on VMs and that they require block-level Changed Block Tracking (CBT) to prevent massive network overhead. But for my lightweight setup, I just wanted a simple way to back up my containers without the corporate bloat.
Instead of walking away, I decided to test out a theory and found a bulletproof workaround using Proxmox’s native tools alongside Veeam. Here is how I set it up, step-by-step:

Step 1: I leverage Proxmox’s Native vzdump

First, I use Proxmox’s built-in CLI or Web GUI to generate standard backups. By navigating to Datacenter > Backup in PVE, I schedule a job that takes a live snapshot of my LXC and compresses it into a single .tar.zst file. Because these files pile up quickly, I set the PVE retention policy to Keep Last: 1. This ensures Proxmox doesn’t do shit here automatically it just fails a backup job if one already exists, kind of dumb it should just create one and purge the old one. cause technically me being able to delete it goes against the rentention policy, where as creating a new one and purging the old one does not.

Step 2: I hook Veeam into the Host Operating System

Since Proxmox stores these dumps locally on the host’s Debian filesystem (usually under /var/lib/vz/dump/), I need a way for Veeam to reach them. I went into the Veeam Backup & Replication console and added my Proxmox host as a Managed Linux Server.
A quick warning if you try this: The Veeam wizard tries to force-install a massive list of unnecessary corporate storage packages (like Dell Data Domain and NetApp drivers) onto your lean Proxmox host. I aggressively unchecked all optional components, keeping only the absolute essentials: the Installer Service and the Veeam Data Mover.

Step 3: I Use a Veeam File Copy Job for Offsite Retention

With Veeam now able to safely browse my Proxmox filesystem, I built a File Copy Job. I pointed the source to my Proxmox dump folder, used a wildcard filter (like *.tar.zst), and set my standard Veeam repository as the destination. Now, Veeam automatically pulls the full compressed backup file off my host every night. Even though Proxmox deletes its local copy the next day, Veeam keeps my historical recovery points safe in my long-term repository. From here we can complete the 3-2-1-0 Rule for backups.

Step 4: Seamless Disaster Recovery to a Second Host

The best part about this architecture is how incredibly simple the restore process is. Proxmox backup files are completely self-contained; they don’t rely on a central database.
If my primary Proxmox host dies, I can add a secondary Proxmox host to Veeam as a managed server. I then use Veeam to copy the .tar.zst backup files directly into the second host’s local dump folder. The exact second the file transfer completes, the backup instantly populates in the second Proxmox GUI under the storage menu. From there, I just hit “Restore,” assign a unique Container ID if needed, and my LXC is back online.
It might not be the “official” automated method Veeam envisioned, but it bypasses their limitations perfectly and works flawlessly for my environment.
It also doesn’t provide any dedup as the base file is literally replaced in place.
Hope this helps someone.

Using Veeam to Migrate from ESXi to Proxmox

Step 1) Have Veeam with Backups from an ESXi Host.

Check.

Step 2) Have a PVE Host.

Check.

Step 3) Add PVE Host to Veeam.

Check. I had a whole bunch of images saved on Img but I lost all the links so the above is a YouTube video that I basically followed to get er done.

The only thing of note here that was annoying is I wanted the worker VM’s network to be in a certain VLAN and the wizard in Veeam didn’t have an option to set it, so I had to enter the network config, and when the wizard was at the testing stage, connect to the PVE host and apply the VLAN tag on the network of the worker VM.

This problem can either be resolved using VNets, SDN for PVE, but the real solution (having a simple text field and applying it into an API call) is “on the roadmap” for Veeam after 2 years knowing about this limitation, that the fix is so simple, it’s mind boggling it not in the initial offering… 

Another thing I found weird with my particular setup (step 2), is that for the snapshot storage I could only pick my EXT4 storage and not the LVMthin.

Step 4) Restore VM to PVE

Even with the worker VM on the host, Veeam wouldn’t give me recovery speed or estimate to recovery, I used the glances command on the PVE host and noticed it was indicating CPU-IOWAIT was the bottle neck,  and seeing the logical disk and each SSD in glances showing only roughly 3 MB/s. I believe this might be due to how the worker VM was configured for its storage settings and how it coded. Took 6 hours but it did work once I did these steps after Veeam said success.

It worked but it wouldn’t boot even with the SCSI controller set to VMware SCSI. I had to detach the HDD, and reattach using SATA and then under VM options pick it for the boot order.

Network wasn’t working had to apply VLAN manually, then install virtio drivers to see the NIC, then manually re-IP and it said IP on old phantom NIC, so remove from that? yes, and network back up.

*Note you should really uninstall VMware tools…. cause for some reason the UN-installer does a hardware check to see if it is a VMware VM, I remember this from when I did a V2P a while back, what does Broadcom have to say about it? “Fuck you, if you didn’t remove the application before converting… fuck you. Uninstaller won’t work, sit there like a tattoo, fuck you bruuuh.”

Quoted from this KB

Issue/Introduction

  • A Windows virtual machine was migrated from vSphere to a non-vSphere environment without uninstalling VMware Tools.
  • Microsoft installer fails to uninstall the VMware tools.
  • No errors are identified during the uninstallation process.

Cause

After migrating the VM to a different platform, the VMware Tools uninstallation process fails because the virtual machine is not running within a vSphere environment.

Resolution

  • This is an expected behavior. <- AKA: We coded this deliberately
  • VMware Tools should be uninstalled prior to migrating the virtual machines out of the vSphere environment. <- AKA: You should of been a perfect admin.
  • Once the migration is completed, the virtual machine is no longer under the support of VMware by Broadcom. <- AKA: Fuck you!

Maybe I’ll cover a blog doing that, but I forgot in my test example. So, make sure you have the latest backup of the VM after removing VMware tools.

Issue #1

Storage Speeds

If you check out, Managing a Proxmox Host – Zewwy’s Info Tech Talks, you can see on the Test VM my Crystal Disk mark speeds and it performed poor on the RAN-t1q1 R/W but the others were fine. I asked AI, it mentioned that LVMThin and the lack of the battery write cache, and the fact it’s DRAM less SSDs creates the issue.

1. The LVM-Thin “Allocation on Commit” Penalty
LVM-Thin allocates space dynamically on demand. When a brand new Windows VM runs CrystalDiskMark, it writes to sectors that have never been written to before.
Every single time a tiny 4KB write occurs, the host operating system has to pause, check the hidden LVM metadata tracker, carve out a raw block from the pool, update the metadata index, and then commit the write. Doing this chunk-by-chunk at Queue Depth 1 (one file at a time) destroys random I/O performance.
2. The Interleaved Stripe Stripe-Size Mismatch
When you created the volume, you explicitly declared a 64k stripe size (-I 64k) across 3 disks (-i 3). This means LVM expects data chunks to be written in 192KB sweeps (64KB x 3) to evenly split the load.
  • CrystalDiskMark is attempting to write a tiny 4KB packet.
  • 4KB is a fraction of a single 64KB stripe.
  • Because it doesn’t span all three drives, the kernel doesn’t gain parallel execution speed. Instead, the storage driver must execute a Read-Modify-Write (RMW) cycle, adding physical disk latency overhead to a minute transaction.
3. Missing VirtIO SCSI Drivers & Write Caching
If you are testing this inside a fresh Windows VM without optimizations, Windows defaults to a generic IDE/SATA controller emulation, which forces synchronous, non-cached writes. Coupled with your HPE B140i controller lacking a battery-backed physical cache, Windows is forcing every single 4KB block to wait until the flash chips on the Kingston A400 SSDs send an physical acknowledgment back up the chain.
For point 3, I didn’t tell AI about my test and second blog post where I actually did cover the difference in the different virtual controllers. However, as we saw we didn’t get much better performance in the RANIO results, OK double in the reads but nothing in the writes. It suggested to change the cache to write back

So I tried this, and with a 64M target saw speeds up to 5x to 10x better results. So I figured really test it and pick 8GB target file. And the other VM I just migrated onto this host lost it pings. Apparently…

Optimizing Proxmox storage using a VirtIO SCSI Single controller paired with io_uring,IO Thread, and Write Back caching can yield a massive 5x to 10x performance boost in small bursts. However, executing a massive storage stress test (like an 8GB CrystalDiskMark run) on budget, DRAM-less hardware (such as Kingston A400 SSDs) can cause a severe cascading system freeze.
Here is exactly what happens behind the scenes when a heavy synthetic workload breaks a virtualized storage layer:
  • The Host RAM Trap (Linux Dirty Throttling): When a VM uses Write back caching, the Proxmox host intercepts writes and absorbs them instantly into its own memory pool. However, once the cache volume hits Linux’s internal threshold (dirty_ratio), the kernel hits an emergency brake. It forcefully halts all concurrent disk I/O requests across the entire storage layer to flush the data down to the physical disks.
  • The DRAM-less Wall: Consumer-grade SSDs lack dedicated onboard DRAM to map where files live. Under a massive, continuous random 4K write assault, their internal Flash Translation Layer (FTL) becomes heavily bottlenecked. Once their small, temporary SLC burst cache fills up, write speeds plunge down to a crawl (1–2 MB/s), causing I/O latency to spike into full seconds.
  • The LVM Storage Deadlock: With the physical drives running at a snail’s pace, the Linux kernel thread managing the thin-LVM volume pool drops into an Uninterruptible Sleep (D state). While the main Proxmox Web GUI stays responsive, any management process trying to hook directly into the VM’s active hardware layer—such as the vncproxy console stream—locks up instantly. The target guest VM drops completely off the network because its virtual hard drive stops responding.
The Fix & Takeaway: To safely benchmark real-world storage limits without triggering a host-level queue lockup, bypass the host RAM cache entirely by setting the VM disk cache mode to Default (No Cache) or Write through.
More testing and learning to commence. interesting finds.

Veeam 13

Veeam 13

It’s out now, but seem many admins are not pleased with how things are going. Due to how bloaty the software has become. See here for the thread which discuses a feature request to select which components should be installed with the application.

Feature Request: Select Components to Install/Upgrade – R&D Forums

I have to agree with the sentiment here, V8 was literally only 800 MBs in size, compact and efficient. V13 has now balloon to over 18 Gigs, which is absolutely mind boggling. Now with components you can’t choose to install or not leaves a larger attack surface that you have to audit and compare against. Along with additional storage space requirements, memory requirements, all for features or services in which you may not even need. I recommend you read the thread, and if you, yourself are a sysadmin having to install and manage Veeam server instance, leave a like in hopes we can bring back some sanity to an otherwise great product.

In this post I’ll be upgrading my home lab instance from Veeam12 to 13, and I guess we’ll see the lack of component selection along the way.

Step 1: Source Software Acquisition

I got Veeam 13 from here: Veeam Software for Enterprise however, note this is a regwalled link and they want your email and phone number for some odd reason… so use whatever tactics you have to, to keep your information private and secure.

Step 2: Mount and Install

How you mount is up to your system, in my case I attached the ISO to my Veeam VM using VMRC, then ran setup.exe

and thennnnn….

and then….

and then…..

no choice, and then….

and thenn….

so dumb… ok.. check off both and then…

and thennnnn….

Let’s get the first one out of the way, it needs over 50 Gigs of free space, I know insane, so lets see if we can get it that… expand the HDD and bam…

Veeam v13 introduces stricter OS‑level requirements and drops support for older Windows versions for any feature that could use AAP—even if you don’t currently use it.

From the v13 system‑requirements updates, Veeam is removing or deprecating support for older platforms to simplify code and improve security. This includes Windows 10/11 builds that no longer meet the updated criteria.

Because AAP interacts deeply with the guest OS (VSS, credentials, application services), Veeam checks all protected VMs for compatibility during the upgrade, not just those with AAP enabled. If any VM is running a Windows build that falls into the “deprecated or limited support” category, Veeam surfaces a warning.

After I removed all Backup jobs pointing to older target VMs (even though non of the had AAP enabled), That warning disappeared. Even with all jobs removed, the last two remained.

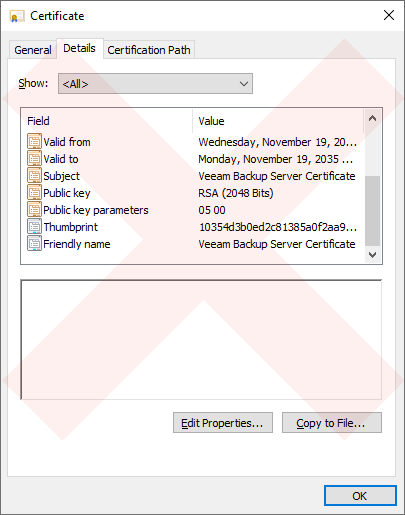
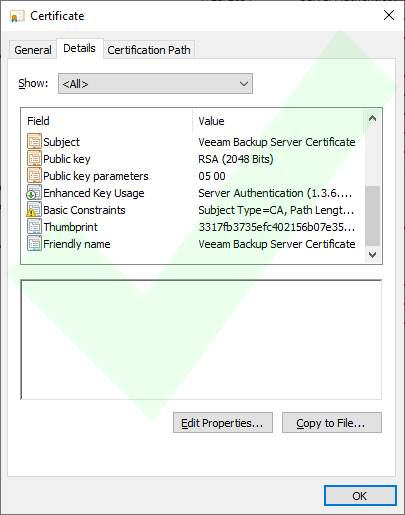
On Veeam Backup Servers where Veeam Backup & Replication was initially installed with an older version and has been upgraded over the years, the initial Veeam Backup Server Certificate may lack the “Basic Constraints” extension, which can cause issues with Platform Plug-Ins.

Issue Validation

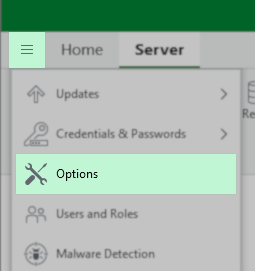
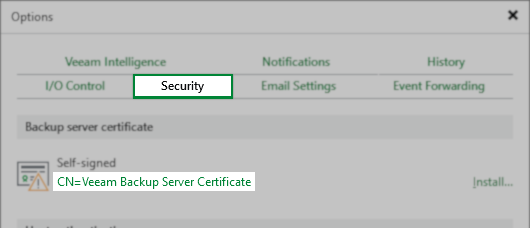
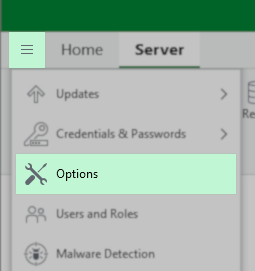
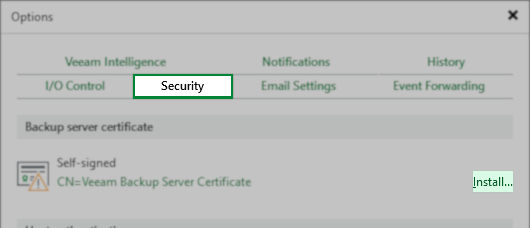
You can view the current Backup server certificate in Main Menu > Options > Security:

The Veeam Backup & Replication Console is shown with the maun menu active and the "Options" menu item is highlighted.
The "Options" window is open to the "Security" tab. Under "Backup server certificate," a self-signed certificate labeled "CN=Veeam Backup Server Certificate" is displayed. There is an "Install..." link on the right side, allowing the user to install a different certificate.
Screenshot of Veeam Backup Server certificate with Basic Constraint field missing with a red faint X over the image to indicate wrong.

Basic Constraint Missing
Screenshot of Veeam Backup Server certificate with the Basic Constraint field present with a green faint checkmark over the image to indicate correct.

Basic Constraint Present

Resolution

Note: If your environment does not use the default self-signed certificate, you must ensure that the CA-signed certificate you provide to Veeam Backup & Replication contains the Basic Constraints extension, and Subject Type = CA must be set within that extension.


For deployments using the self-signed Veeam Backup Service Certificate, a new one must be generated:

  1. From the Main Menu, click Options
The Veeam Backup & Replication Console is shown with the maun menu active and the "Options" menu item is highlighted.
  1. In the Options dialog box, select the Security tab.
  2. On the Security tab, click “Install…“in the “Backup server certificate” section.
The "Options" window is open to the "Security" tab. Under "Backup server certificate," a self-signed certificate labeled "CN=Veeam Backup Server Certificate" is displayed. There is an "Install..." link on the right side, allowing the user to install a different certificate.
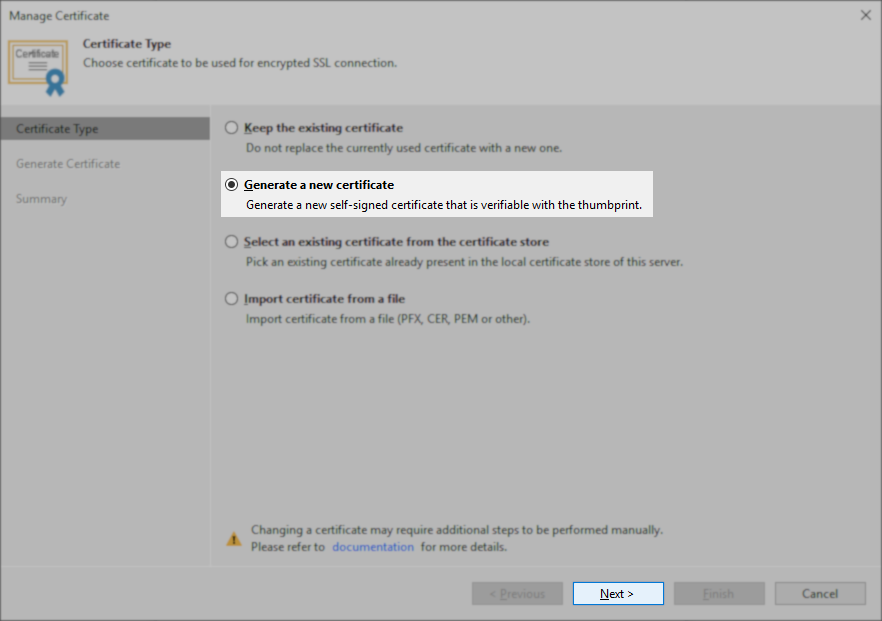
  1. In the Certificate creation wizard, select the option for Generate a new certificate, and click Next.
The "Manage Certificate" wizard is open to the "Certificate Type" step. Options are listed for SSL certificate selection: "Keep the existing certificate," "Generate a new certificate" (selected), "Select an existing certificate from the certificate store," and "Import certificate from a file." A description for each choice is provided. The "Next >" button is highlighted at the bottom.
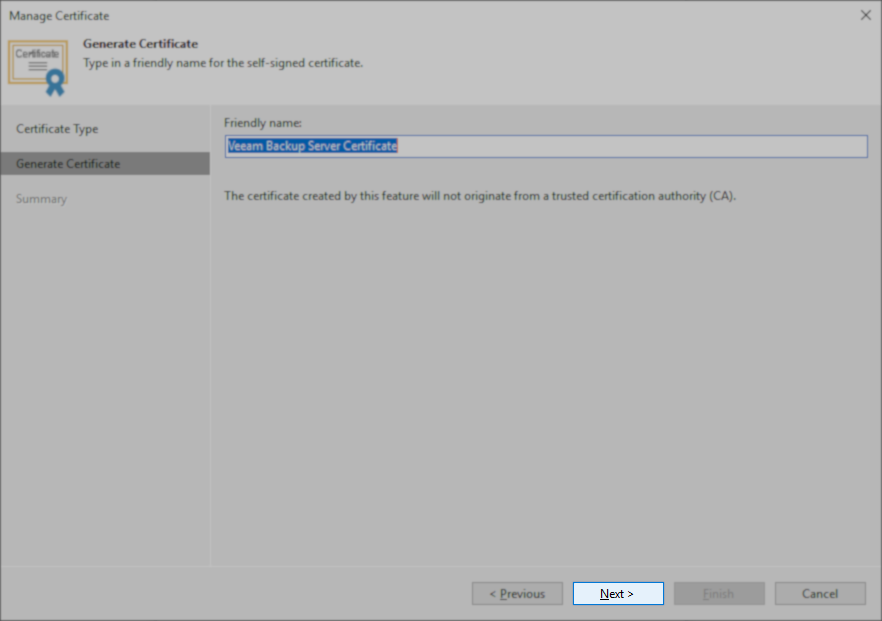
  1. On the Generate Certificate step, leave the friendly name as Veeam Backup Server Certificate, and click Next.
The "Manage Certificate" wizard is open to the "Generate Certificate" step. The user is prompted to enter a friendly name for the new self-signed certificate, with the field set to "Veeam Backup Server Certificate." A note below indicates the certificate will not originate from a trusted certification authority (CA). "Next >" and "Cancel" buttons are visible at the bottom.
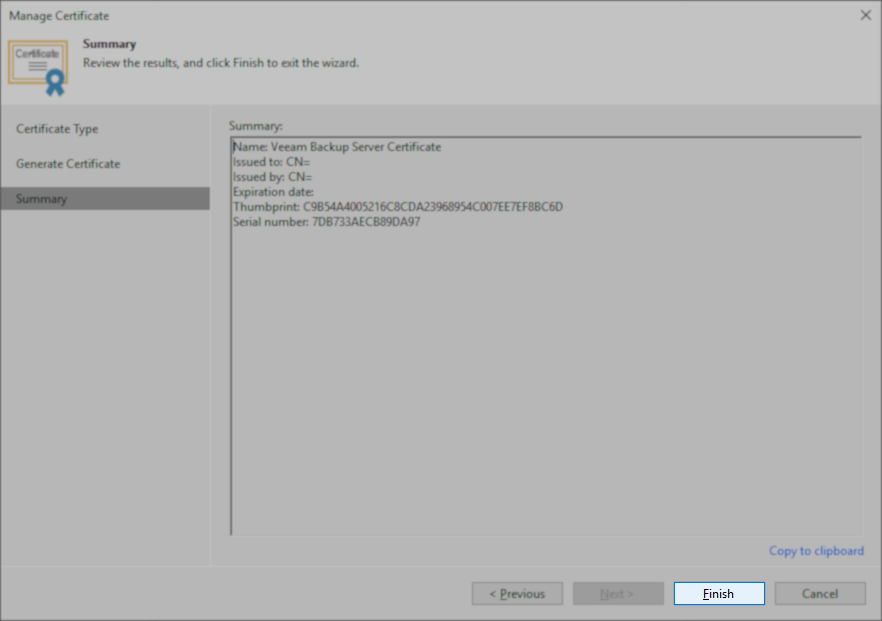
  1. On the Summary steps, click Finish.
The "Manage Certificate" wizard is open to the "Summary" step. Certificate details are shown, including name ("Veeam Backup Server Certificate"), issued to, issued by , expiration date, thumbprint, and serial number. The "Finish" button at the bottom right is highlighted, allowing the user to complete the certificate generation process.
Retry and.. oh look it’s gone now…

Option A — Remove old plug‑ins from “Backup Infrastructure → Plug‑ins”

If any plug‑ins appear there, remove them.

Option B — Clean stale entries from the configuration database

This requires Veeam Support. They run a script to remove:

  • orphaned plug‑in records
  • deprecated feature flags
  • old certificates
  • legacy hypervisor entries

This is the only guaranteed fix.

Option C — Ignore the warning

This is acceptable because:

  • It does not block the upgrade
  • It does not affect backup/restore
  • It only indicates that V13 will delete unused legacy components
Option 3 sounds good to me.. NEXT!
As you can see, no options for picking anything. and it blew up on me, the service fails to start.
Checking the logs says it’s doesn’t like my new ESXi host I added to my cluster… but no reason why…

Take 2

I installed Veeam fresh, so I could restore my Veeam12 instance. Let’s try this again. This time I removed the new ESXi host I added to vcenter by removing it from the inventory (in hopes to give the service no reason to fail this time).

I also removed the inaccessible Backup Copy Repo, after deleting all the backup copy jobs. removed the couple dead Hyper-V hypervisors. Fixed the backup jobs using my personal blog post after the vCenter was brought up a new (instead of using the “supported method“), since it didn’t work properlly when I did it just before this Veeam upgrade. And ran all backup jobs to ensure success, and proper backup chains staying intact.

K, I also fixed the certificate and verified it has the basic constraints.

Lets go through the whole upgrade process as above again, and see how she goes this time. I clicked next accepting the two warning about features no longer available (probably a repo setting is my guess) and Application aware processing (since I didn’t have it configured on any jobs anyway).
Nice, better than the first attempt. Worked this time around.

New vCenter Same Veeam

The Story

The Niche Situation

Now I know the title might sounds strange, but this is to cover a niche issue which may randomly arise out in the industry. vCenter died, there was no backup, a new vCenter was spun up in its place with all the same hostname, IP address and everything, and the hosts re-added, and you happen to use Veeam as your backup solution. Now I have been down this rabbit hole in the past, and I have blogged about an unsupported method to fix the Veeam jobs in the situation. But it’s technically unsupported, so I asked what the “supported method” would be on the Veeam forms.

The short answer, “Oh just use the VM-Migrator tool”, as referenced here.

“Veeam Backup & Replication tracks VMs in jobs using Managed Object Reference IDs (MORef-IDs), which change after migration or recreation of vCenter, causing MORef-ID misalignment.

Veeam VM Migrator utility is integrated into Veeam Backup PowerShell module, and it allows you to resolve MORef-ID misalignment. As a result, your backup incremental chains will remain intact after an inventory change in vCenter.

The utility consists of the following cmdlets:

  • Set-VBRVmBiosUuid — this cmdlet updates the BIOS UUIDs of existing VM entries within the Veeam Backup & Replication configuration database based on information from the old vCenter.
  • Set-VBRVCenterName — this cmdlet modifies vCenter name by adding the _old suffix to its name.
  • Generate-VBRViMigrationSpecificationFile — this cmdlet generates a migration task file which contains the list of mapping tasks.
  • Start-VBRViVMMigration — this cmdlet starts MORef-IDs update.”

So, this tool is supposed to do what I did via the backend but this is a supported frontend tool to do it, but I case is generally different than what the tool wants in that my old and new vCenter are the same, and not simply two unique instances of vCenter with unique names both running live in parallel. Mines simply been directly rebuilt in place.

Step 1) Realize your vCenter is toast.

However, you realize this, will be random and situational, in my case my trial expired, and all ESXi hosts show disconnected. I’m gonna treat this as a full loss, by simply shutting down and nuking all the VM files… it’s simply dead and gone…. and I have no configuration backup available.

This is why this is considered a niche situation, as I’d hope that you always have a configuration backup file of your critical infrastructure server. But… what if (and here we are, in that what if, again)…

Step 2)  Rebuild vCenter with same name.

Yay, extra 20 min cause of a typo, but an interesting lesson learnt.

Renaming vCenter SSO Domain – Zewwy’s Info Tech Talks

Let’s quickly rebuild our cheap cluster,  configure retreat mode and add our hosts back in…

OK so now we’ve set our stage and we have a broken Veeam instance, if we try to scan it it will be no good cause the certificate has changed, from the center changing… so David says “So in your case, if you can restore Veeam’s configuration database to before you made these changes, instead of your step 4 there, you will begin the migration procedure and use the Set-VBRVCenterName cmdlet on the existing vCenter in Veeam, re-add your newly rebuilt vCenter to Veeam, and then perform the migration.”

Step 3) run “Set-VBRvCenterName”.

So far, so good.. now..

Step 4) Add new vCenter to Veeam.

Step 5) Generate Migration File.

Now I’m back to assuming, cause instructions are unclear in Veeams provided guidance. I’m assuming I have to run the generate command before I run the start migration command….

Checking out the generated file, its a plain text file with a really weird syntax choice, but the VM-IDs are clearly as I was doing manually in my old blog post.

Step 6) Start the Migration.

I have no clue what that warning is about… I mean the new vCenter was added to Veeam, the VM IDs matched what I see in the URL when navigating them, like my old blog… I guess I’ll just check on VBR console…

I did a recalculate on the VM inside the backup job and it calculated, so looks like it worked. Let’s run a backup job and check the chain as well…

The Job ran just fine…  and the chains still intact. Looks like it worked, this was the supported way, and it did feel easier, especially if scaled out to hundreds of VMs.

Hope this helps someone.

Adding a Hyper-V host to Veeam

Before You Begin – Veeam Backup & Replication User Guide for Microsoft Hyper-V

Before you add a Microsoft Hyper-V server to the backup infrastructure, check the following prerequisites:

  • Check permissions required to add the server. For more information, see Permissions.
    • Admin permissions based account got it…
  • [For SCVMM] SCVMM Admin UI must be installed on the backup server. Otherwise, you will not be able to add SCVMM servers to the backup infrastructure.
  • SCVMM console version must match the management server version.
  • Make sure that you do not add to the backup infrastructure Hyper-V hosts or clusters managed by an SCVMM server if this SCVMM server is already added to the backup infrastructure.
    • Nope just a stand alone host
  • File and printer sharing must be enabled in network connection settings of the added Microsoft Hyper-V host. Otherwise, Veeam Backup & Replication will fail to deploy required components.
    • Uhhh wut?
  • Make sure that the NETBIOS name of the Microsoft Hyper-V Server is successfully resolved.
    • Uhhh wut?
  • If you get the “Invalid Credentials” error when adding a Hyper-V host using a local account, see this Veeam KB article.

This is gonna suck..

Unable to add a single Hyper-V host to Veeam. : r/Veeam

i am unable to add Hyper V hosts to Veeam | Veeam Community Resource Hub

Why?…

When you add a Hyper‑V host to Veeam Backup & Replication, the product deploys its transport service and integration components remotely using Windows’ built‑in administrative shares (ADMIN$, C$). That’s why File and Printer Sharing must be enabled on the NIC: without those hidden shares, Veeam cannot copy files or install its agents. By default, only the built‑in Administrator or domain admin accounts can access these shares remotely, because User Account Control (UAC) strips remote admin rights from other local accounts. This often surprises people who harden their hosts by disabling the Administrator account or removing shares, since Veeam’s deployment model depends on them being present.

On standalone Hyper‑V hosts, this creates a security trade‑off. You can either leave the built‑in Administrator enabled (simpler, but harder to audit), or disable UAC remote restrictions so named local admin accounts can access the shares (more auditable, but technically weaker security posture because all local admins gain remote rights). In practice, many administrators prefer creating a dedicated service account for Veeam and a separate account for human administration, then disabling the built‑in Administrator. This way, activity is traceable and controlled, while still allowing Veeam to function. The nuance is that Veeam chose the “lowest common denominator” approach — SMB admin shares — which works everywhere but clashes with modern hardening practices, so standalone hosts require careful balancing of convenience, auditability, and exposure.

Step 1) Enable SMB

Install-WindowsFeature -Name FS-FileServer -IncludeManagementTools

Edit your firewall rules as required as this will create 3 new ones and open them up (135 DCOM, 445 SMB, and dynmic ports one), in my case I disabled them and only enabled the SMB restrictive rule.

Check off Microsoft file and print sharing service under the NIC settings for which will be used to add Hyper-V to Veeam.

Maybe we can enable it only during deployment then disable it, lets find out. On Hyper-V lets create a dedicated Veeam admin account, then disable remote UAC while adding the host to Veeam. Done, adding host to Veeam…

Option 1) Specify the local administrator account. (Usually disabled on hardened servers)

OR

Option 2) edit registry to allow remote uac, so the built in admin shares can be accessible by admin account that is named and not the built in administrator account.

Why Veeam does allow for the ability to prepare a Hyper-V host via these install packages manually without exposing the post to these additional attack surfaces is honestly beyond me. I usually love Veeam but this one is kind of dumb.

Step 2) Disable Remote UAC restrictions

I’ll stick with option 2: User Account Control and remote restrictions – Windows Server | Microsoft Learn

To disable UAC remote restrictions, follow these steps:

  1. Click Start, click Run, type regedit, and then press ENTER.
  2. Locate and then click the following registry subkey:
    HKEY_LOCAL_MACHINE\SOFTWARE\Microsoft\Windows\CurrentVersion\Policies\System
  3. If the LocalAccountTokenFilterPolicy registry entry doesn’t exist, follow these steps:
    1. On the Edit menu, point to New, and then select DWORD Value.
    2. Type LocalAccountTokenFilterPolicy, and then press ENTER.
  4. Right-click LocalAccountTokenFilterPolicy, and then select Modify.
  5. In the Value data box, type 1, and then select OK.
  6. Exit Registry Editor.

Now open a file explorer window in Veeam Server, and point to \\IPofHyper-V\admin$ it should prompt you for creds, you should be able to provide the creds of the named admin account and it should connect.

Well I got past the error…

Sigh n’ groan…. ughhhh.. too be continued, time to make a Server 2025 image…

Lets try again..

And this time success…

Restore Storage Theory

🖥️ Scenario

  • Source: Veeam is running inside a VM on ESXi.
  • Repository: Local storage attached to that VM (so Veeam sees it as a local NTFS/ReFS volume).
  • Target: A standalone Hyper‑V host with only local storage (no SMB shares, no clustered SOFS).

🔧 How Veeam Writes the VM HDD Files

  1. Restore job starts
    • You pick the Hyper‑V host as the restore target.
    • Veeam knows it must deliver VHDX files + VM configuration to that host’s storage path (e.g., D:\VMs\MyVM\).
  2. Transport service on Hyper‑V host
    • Veeam deploys or uses its Veeam Data Mover Service (part of the Veeam transport service) on the Hyper‑V host.
    • This service is responsible for receiving blocks of data and writing them to disk.
  3. Data transfer
    • The Veeam server (on ESXi) reads blocks from the backup file in its local repository.
    • Those blocks are sent over the network to the Hyper‑V host using Veeam’s own transport protocol (TCP/IP).
    • Important: This is not SMB — it’s Veeam’s proprietary data mover channel.
  4. File creation on Hyper‑V host
    • The transport service on the Hyper‑V host opens a file handle on the local filesystem (NTFS/ReFS).
    • It creates the target VHDX file and writes the incoming blocks directly using standard Windows file I/O APIs (CreateFile, WriteFile, etc.).
    • VM configuration files (.vmcx, .vmrs) are also written directly to the host’s local storage.
  5. Completion
    • Once all blocks are written, Hyper‑V sees the restored VM files in its local storage.
    • Veeam registers the VM with Hyper‑V Manager if you chose a full VM restore.

✅ Key Points

  • No SMB is used here.
  • Veeam uses its own transport service to push data over TCP/IP to the Hyper‑V host, which then writes the files directly to local disk.
  • SMB only comes into play if the repository or Hyper‑V storage is on a remote file server (like a NAS or SOFS cluster).

Retore to Hyper-V

Here a whole video on the process, cause I wasn’t sure how to do it as when I selected restore entire VM to new location, only my ESXi hosts were selected, AI said it not possible, Googling said that Instant Restore was the only option… mhmm that video showed the same thing…

I won’t lie I felt so dumb at first cause the restore prompt said “waiting on user input” and there was an open console link at the bottom of the instant restore wizard, so I clicked that and it kept asking for creds (I thought the hyper-v ones) and it kept failing… till I realized you just have the VM already running (or not based on your selection) but it’s already registered to the host, you have to finish an instant restore by clicking migrate to production option.

I tell ya… that made me feel really…. reallllly dumb…..

anyway I hope this posts helps someone.


Migrating/Restoring Veeam

Migrating/Restoring Veeam

In one of my pervious posts I discussed upgrading Veeam, today I want to discuss migrating it entirely. Or recovering it, as this process here is essentially the same.

Disclaimer what you do in your own environment is on you, everything in this blog is for educational purposes only. This also doesn’t cover encryption management all data is moved in-place (E.G disconnecting, and reconnecting an HDD from one machine to another), with the data at rest being unencrypted.

Step 1) Sign in to Veeam portal

I didn’t have a paid product license, so my download section was full of free trial links. Since I’m using CE (community edition) from here: Free Backup Software For Windows, VMware, & More – Veeam

Step 2) Download the ISO

it’s a doosy at 13 GBs

Step 3) Read the update notes for any expected issues/outcomes.

For all the FAQs go here: Veaam Upgrade FAQs

For basic System Requirements and release notes see here: Veeam Backup & Replication 12.3 Release Notes

The main thing will be the change of the server SQL service, moving from MS SQL Express, to PostgresDB, Though it’s not directly mentioned from what I can see other than the step 8 in the Upgrade path: Upgrading to Veeam Backup & Replication 12.3 – User Guide for VMware vSphere

Step 4) Attach the ISO

Attach it to the server being upgraded or installed on.

in my case this time, I’m simply cloning my freshly semi hardened Windows11 image, giving it a whopping 8GB of RAM, and 64Gig HDD for the OS and Veeam App to live on. While that’s being prepared lets take a config backup of our veeam server to make our lives easier.

Step 5) Backup Config.

I’d hope you’d have this configured before your Veeam server failed.

Veeam B&R -> File -> Backup Config, in our case save it to backup data drive as that will be moved and mounted first thing, we can then use that to load the config and should be good to go.

Now it shows up under Drive:\VeeamConfigBackup\Hostname\Hostname_Datestamp.bco

Step 6) Install Veeam on New Server

Depending on your Uptime requirements, you can either spin up the new server with a temp different IP, get the Veeam app and services installed, then move your discs and change IP’s. Since I don’t care in my lab, I’ll fully shutdown my existing server to free up the IP and system resources. then boot up my new server, attach the downloaded ISO in step 1, and install Veeam.

Hostname, networking, and other prerequisites are not discussed in details here.

I like how it knows, click install…

Install B&R

How long we wait is based on the Matrix. Looking at the VM resource usage, and my machines based on the setup, looks like it’s reading from the ISO to load installation files. and writing it somewhere to disk, my setup only yielded me about 40 MB’s and took roughly 8 minutes.

Agree to the EULA.

License upgrade: (I’ll try not selecting this since CE, nope wizard wouldn’t let me for CE, shucks hahah)

Service account, Local System (recommended). I left this default, next.

This is why I like Veeam, made by sysadmins for sysadmins.

Install, and now we wait… once complete

Step 7) Attach disk with backup data

How you do this is up to you, I got the needful done.

Step 8) Open Veeam B&R Console, and import config backup.

In Veeam B&R Console, click what should be file -> Config Backup, then click restore button.

Now, I picked restore since I shutdown my OG server to move the data as a whole, so I picked restore:

The config deets check em over, I don’t know what the minimum gap between version is allowed, but in this case 12.3.1 source, to target 12.3.2

Target Data is localhost, pay attention to the login name, if you ever change the local admin account or whatever account installs Veeam, this could be an issue to your SQL Veeam config.

yes…

Restore…

Yes…

Wait for services to all stop…

success… until it’s not…

This for some reason failed…

I clicked start and it seemed to start everything up just fine…

But no matter what when I tried to rescan any repos in the console it would complain that not all components were upgraded. Everything AI was telling me was off and felt wrong.. I found this one thread with the statement “It seems that not all Windows 10 installations are facing this problem. We’ll try to figure out of certain builds are involved in this. On the other hand, a fresh v12 install in Win10 works without any problems.” Well This is a fresh install, it happened after the backup import, when I did the last upgrade back in March, it was ain in place upgrade from 12.1 to 12.3, and I didn’t have this problem.

After enough fooling around I found my answer here, which was to run the provided script. finding the component listed with 0.0 as noted in the thread. Strange.

Then finally the part of the wizard completed:

Update Veeam 12.3

Grab Update file from Veeam.

Step 1) Sign in to Veeam portal

I didn’t have a paid product license, so my download section was full of free trial links. Since I’m using CE (community edition) from here: Free Backup Software For Windows, VMware, & More – Veeam

Step 2) Download the ISO, it’s a doosy at 13 GBs

Step 3) Read the update notes for any expected issues/outcomes.

For all the FAQs go here: Veaam Upgrade FAQs

For basic System Requirements and release notes see here: Veeam Backup & Replication 12.3 Release Notes

The main thing will be the change of the server SQL service, moving from MS SQL Express, to PostgresDB, Though it’s not directly mentioned from what I can see other than the step 8 in the Upgrade path: Upgrading to Veeam Backup & Replication 12.3 – User Guide for VMware vSphere

Step 4) Attach the ISO to the server being upgraded or installed on

My case a 12.1 based server.

My case it’s a VM, so I just attach it via VMRC.

Step 5) Run the Installer

Make sure you stop any “continuous” jobs, and close the B&R Console.

Double Click Setup.exe on the mounted ISO’s main directory.

If you haven’t guessed it, click Upgrade. Yes, nice to see coding done where it just does a check and knows it’s a Veeam server, so the only option is to Upgrade.

In my case I again only have one option to choose from.

How long we wait is based on the Matrix. Looking at the VM resource usage, and my machines based on the setup, looks like it’s reading from the ISO to load installation files. and writing it somewhere to disk, my setup only yielded me about 40 MB’s and took roughly 8 minutes.

Agree to the EULA.

Upgrade the server, here’s you have a checkbox to update remote components automatically (such as Veeam proxies). In my lab the setup is very simply so I have none. I just click next.

License upgrade: (I’ll try not selecting this since CE, nope wizard wouldn’t let me for CE, shucks hahah)

Service account, Local System (recommended). I left this default, next.

Here’s the OG MS SQL instance:

… yes?

For the Veeam Hunter service… ignore (Shrug)

free space… needs more than 40 Gigs… holy molly….

43.1 GB required, 41 GB Available. Unreal, guess I’ll extend the drive, great part of running VMs. 🙂

Finally! Let’s Gooooo! and sure enough first step.. here comes the new SQL instance.. this is probably why it requires over 40 gigs to do the install, to migrate the SQL instance from MS SQL to Postgres…. Wonder if space will be reclaimed by removal of the MS SQL Express instance….

Roughly half hour later…

Mhmmm checking the services I see the orginal MS SQL instance is still there running. I see a postgres service.. not running… uhhhh mhmmm…

All Veeam services are running, open the Veeam B&R console, connect, and yup it opens. The upgrade component wizard automatically opened, and it updated the only item.. itself.

*UPDATE* Patch for latest CVE of 9.9. If you have a domain joined Veeam server.

KB4724: CVE-2025-23120

*thumbs up* It’s another 8 gig btw…

Veeam VM Restore failed: Cannot apply encryption policy. You must set the default key provider.

So in my Lab vCenter went completely POOOOOF. So, I installed it fresh.

After vCenter was installed, I updated my Veeam configuration to ensure my backup chains wouldn’t break which still works great by the way.

One VM was missing from my vSphere. So I went to restore it when all of a sudden:

I remembered by post about configuring a Native Key Provider cause it was required as such to have a vTPM. So I thought, is this a “PC Load Letter” problem, and it’s actually just complaining that I didn’t configure a NKP for it to “apply encryption policy”?

Follow the same old steps to configure a NKP.

  • Log in to the vSphere Client:
    • Open the vSphere Client and log in with your credentials.
  • Navigate to Key Providers:
    • Select the vCenter Server instance.
    • Click on the Configure tab.
    • Under Security, click on Key Providers.
  • Add a Native Key Provider:
    • Click on Add.
    • Select Add Native Key Provider.
    • Enter a name for the Native Key Provider.
    • If you want to use hosts with TPM 2.0, select the option Use key provider only with TPM protected ESXi hosts.
  • Complete the Setup:
    • Click Add Key Provider.
    • Wait for the process to complete. It might take a few minutes for the key provider to be available on all hosts.
  • Backup the Native Key Provider:
    • After adding the Native Key Provider, you must back it up.
    • Click on the Native Key Provider you just created.
    • Click Backup.
    • Save the backup file and password in a secure location.

Once I did all that…

No way that actually worked. But will it boot? Well it def “booted” but it asked for the BitLocker key (which makes sense since we created a new TPM and it doesn’t have the old keys). I checked my AD and sadly enough for some reason it didn’t have any BitLocker keys saved for this AD object/VM.

Guess this one is a loss and the importance of saving your encryption keys.

Veeam Backup Encryption

Story

So, a couple posts back I blogged about getting a NTFS USB drives shared to a Windows VM via SMB to store backups onto, so that the drive could easily plugged into a Windows machine with Veeam on it to recover the VMs if needed. However, you don’t want to make it this easy if it were to be stolen, what’s the solution, encryption… and remembering passwords. Woooooo.

Veeam’s Solution; Encryption

Source: Backup Job Encryption – User Guide for VMware vSphere (veeam.com)

I find it strange in their picture they are still using Windows Server 2012, weird.

Anyway, so I find my Backup Copy job and sure enough find the option:

Mhmmm, so the current data won’t be converted I take it then…

Here’s the backup files before:

and after:

As you can see the old files are completely untouched and a new full backup file is created when an Active full is run. You know what that means…

Not Retroactive

“If you enable encryption for an existing job, except the backup copy job, during the next job session Veeam Backup & Replication will automatically create a full backup file. The created full backup file and subsequent incremental backup files in the backup chain will be encrypted with the specified password.

Encryption is not retroactive. If you enable encryption for an existing job, Veeam Backup & Replication does not encrypt the previous backup chain created with this job. If you want to start a new chain so that the unencrypted previous chain can be separated from the encrypted new chain, follow this Veeam KB article.”

What the **** does that even mean…. to start I prefer not to have a new chain but since an Active full was required there’s a start of a new chain, so… so much for that. Second… Why would I want to separate the unencrypted chain from the new encrypted chain? wouldn’t it be nice to have those same points still exist and be selectable but just be encrypted? Whatever… let’s read the KB to see if maybe we can get some context to that odd sentence. It’s literally talking about disassociating the old backup files with that particular backup job. Now with such misdirected answers it would seem it straight up is not possible to encrypt old backup chains.

Well, that’s a bummer….

Even changing the password is not possible, while they state it is, it too is not retroactive as you can see by this snippet of the KB shared. Which is also mentioned in this Veeam thread where it’s being asked.

So, if your password is compromised, but the backup files have not you can’t change the password and keep your old backup restore points without going through a nightmare procedure or resorting all points and backing them up somehow?

Also, be cautious checking off this option as it encrypts the metadata file and can prevent import of not encrypted backups.”You can enter password and read data from it, but you cannot “remove the lock” retroactively”

“Reason why Veeam asks for passwords even on non-encrypted chains, is because backupdata metadata(holding information about all restore points in the chain, including encrypted and non encrypted ones) is encrypted too!”

“Metadata will be un-encrypted when last encrypted restore point it describes will be gone by retention.”

Huh, that’s good to know… this lack of retroactive ability is starting to really suck ass here. Like I get the limitations that there’d be high I/O switching between them, but if BitLocker for windows can do it for a whole O/S drive LIVE, non-the-less, why can’t Veeam do it for backup sets?

Summary

  • Veeam Supports Encryption
    • Easy, Checkbox on Backup Job
    • Uses Passwords
    • Non Retroactive

I’ll start off by saying it’s nice that it’s supported, to some extent. What would be nice is:

  1. Openness of what Encryption algos are being used.
  2. Retroactive encryption/decryption on backup sets.
  3. Support for Certificates instead of passwords.

I hope this review helps someone. Cheers.