IIS redirect HTTP to HTTPS

The Requirement

Recently I posted about creating and using a certificate for use on and IIS website. I did this recently for my Dev to deploy his new web app, which required use of a devices camera for QR scanning purposes, well it runed out that the camera could not be used unless the app was secured with TLS (a certificate). So we created a cert and created a new secure binding.

However, it was soon pretty apparent every time I pressed the down arrow key on my browsers URL it would use the regular HTTP (at first we removed the port 80 binding which caused site unavailable issue). So after re-adding the standard port 80 binding for regular HTTP, I decided to use a rewrite rule to handle the redirection.

It wasn’t as intuitive as I thought it would be so a little google search and I was on my way…

As the source states, after you have your certificate and port binding for HTTPS, as well as one for regular HTTP.

In order to force a secure connection on your website, it is necessary to set up a certain HTTP/HTTPS redirection rule. This way, anyone who enters your site using a link like “yourdomain.com” will be redirected to “https://yourdomain.com” or “https://www.yourdomain.com” (depending on your choice) making the traffic encrypted between the server and the client side.

Below you can find the steps for setting up the required redirect:

The Source

    1. Download and install the “URL Rewrite” module.
    2. Open the “IIS Manager” console and select the website you would like to apply the redirection to in the left-side menu:iisred1
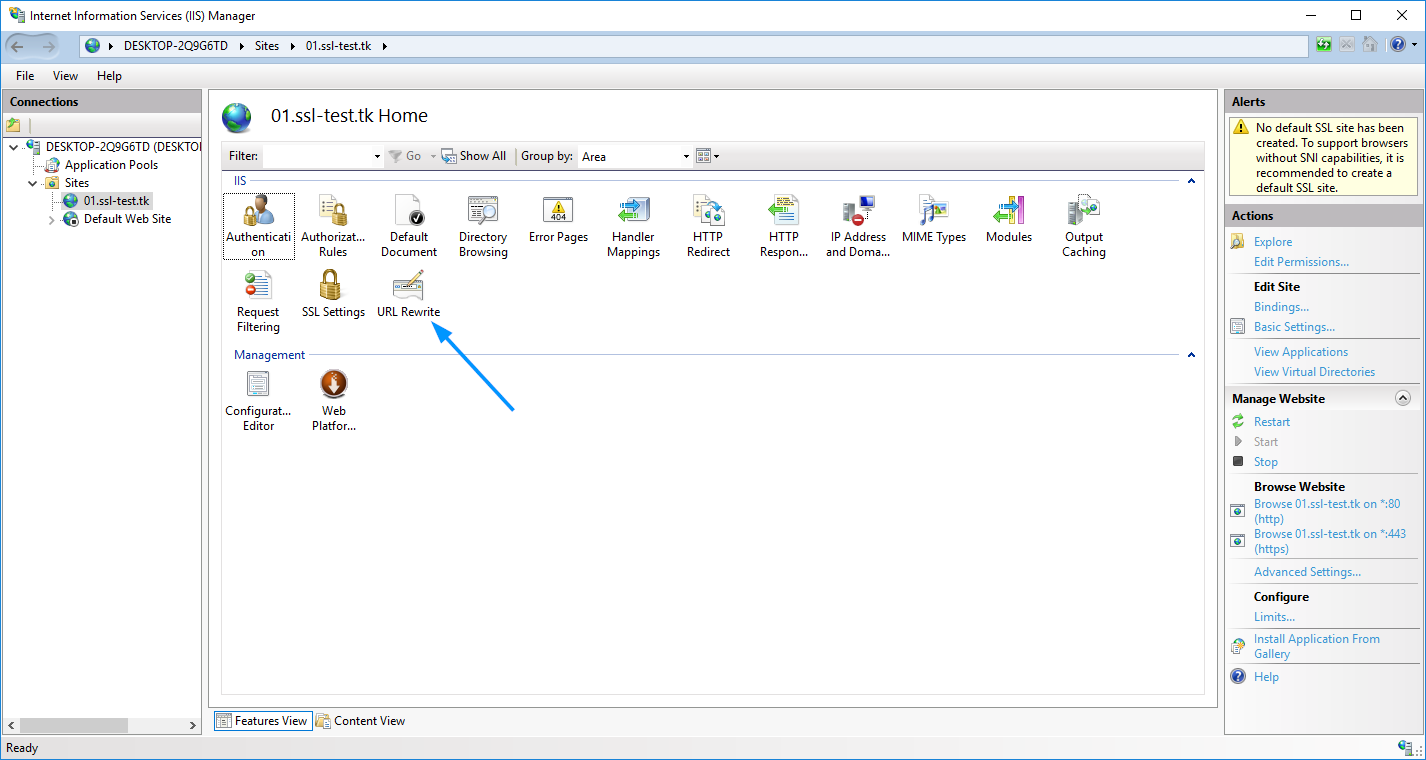
    3. Double-click on the “URL Rewrite” icon.
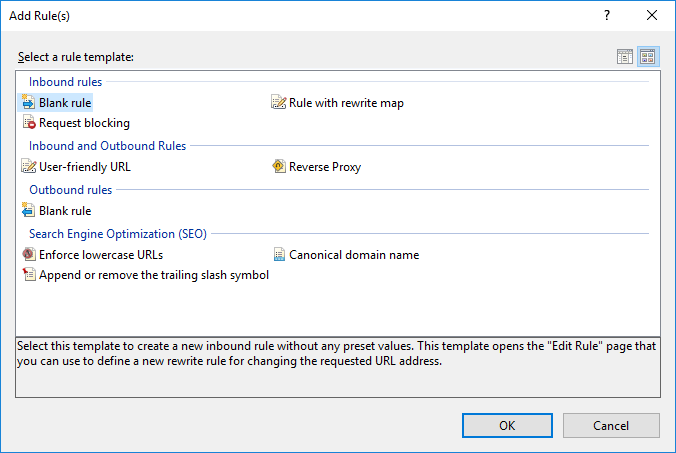
    4. Click “Add Rule(s)” in the right-side menu.
    5. Select “Blank Rule” in the “Inbound” section, then press “OK”:iisred2
    6. Enter any rule name you wish.
    7. In the “Match URL” section:- Select “Matches the Pattern” in the “Requested URL” drop-down menu
      – Select “Regular Expressions” in the “Using” drop-down menu
      – Enter the following pattern in the “Match URL” section: “(.*)”
      – Check the “Ignore case” box

      iisred3

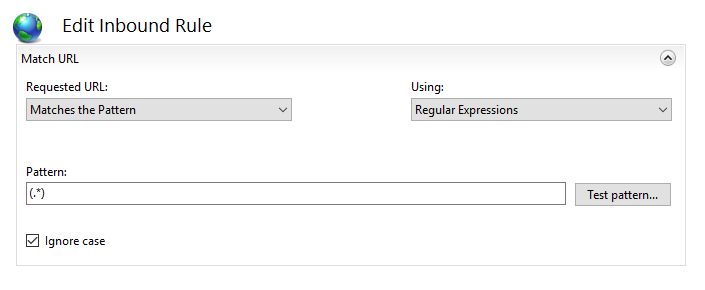
    8. In the “Conditions” section, select “Match all” under the “Logical Grouping” drop-down menu and press “Add”.
    9. In the prompted window:
      – Enter “{HTTPS}” as a condition input
      – Select “Matches the Pattern” from the drop-down menu
      – Enter “^OFF$” as a pattern
      – Press “OK”

      iisred4

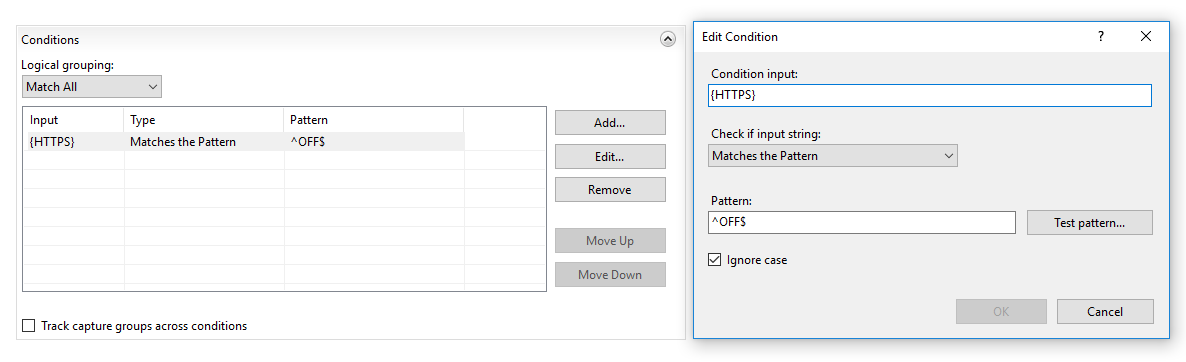
    10. In the “Action” section, select “Redirect” as the action type and specify the following for “Redirect URL”:https://{HTTP_HOST}/{R:1}
    11. Check the “Append query string” box.
    12. Select the Redirection Type of your choice. The whole “Action” section should look like this:iisred5

The Note

NOTE: There are 4 redirect types of the redirect rule that can be selected in that menu:
– Permanent (301) – preferable type in this case, which tells clients that the content of the site is permanently moved to the HTTPS version. Good for SEO, as it brings all the traffic to your HTTPS website making a positive effect on its ranking in search engines.
– Found (302) – should be used only if you moved the content of certain pages to a new place *temporarily*. This way the SEO traffic goes in favour of the previous content’s location. This option is generally not recommended for a HTTP/HTTPS redirect.
– See Other (303) – specific redirect type for GET requests. Not recommended for HTTP/HTTPS.
– Temporary (307) – HTTP/1.1 successor of 302 redirect type. Not recommended for HTTP/HTTPS.

  1. Click on “Apply” on the right side of the “Actions” menu.

The redirect can be checked by accessing your site via http:// specified in the URL. To make sure that your browser displays not the cached version of your site, you can use anonymous mode of the browser.

The Helping Hand

The rule is created in IIS, but the site is still not redirected to https://

Normally, the redirection rule gets written into the web.config file located in the document root directory of your website. If the redirection does not work for some reason, make sure that web.config exists and check if it contains the appropriate rule.

To do this, follow these steps:

  1. In the sites list of IIS, right-click on your site. Choose the “Explore” option:iisred6
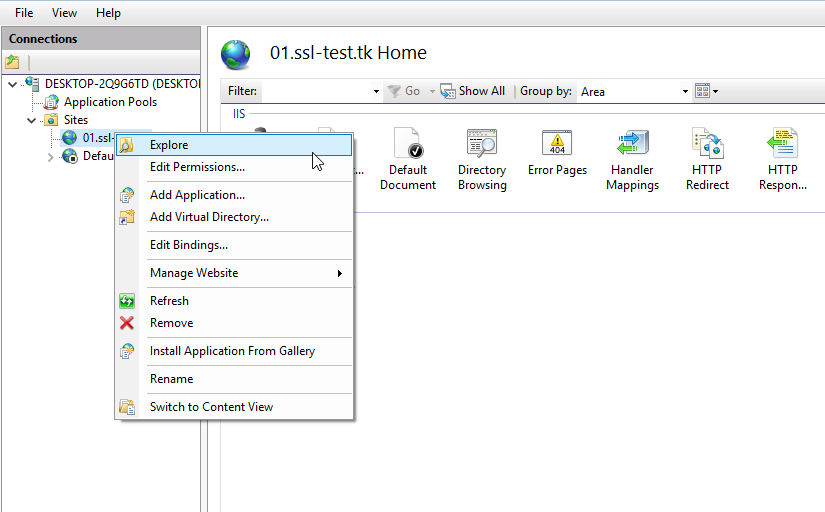
  2. “Explore” will open the document root directory of the site. Check if the web.config file is there.
  3. The web.config file must have the following code block:
    <configuration>
    <system.webServer>
    <rewrite>
    <rules>
    <rule name=”HTTPS force” enabled=”true” stopProcessing=”true”>
    <match url=”(.*)” />
    <conditions>
    <add input=”{HTTPS}” pattern=”^OFF$” />
    </conditions>
    <action type=”Redirect” url=”https://{HTTP_HOST}/{R:1}” redirectType=”Permanent” />
    </rule>
    </rules>
    </rewrite>
    </system.webServer>
    </configuration>
  4. If the web.config file is missing, you can create a new .txt file, put the aforementioned code there, save and then rename the file to web.config.

This one, much like my Offline Root CA post is a direct copy of the source. For the same reason, I felt I had no need to re-word it as it was very well written.

Thanks Namecheap, although it would have been nice to thank the actual author who took the time to do the beautiful write up with snippets. 🙂

Creating, requesting, approving, installing Certificates on IIS Core

One way:

  1. Open Certificates Snap-in from Remote Management computer.
  2. Connect to remote computers Machine store (Core-IIS).
  3. Right click the Personal Store object (folder) -> All tasks -> Advanced Operations -> Create Custom Request…
  4. Pick Enrollment Policy (Custom Request for 3rd Party CAs) I have internal CA, So I picked AD Enrollment Policy.
  5. Template – Web Server | PKCS #10
  6. Click Details to expand the AD EP – Web Server template properties (Make sure you enter a common name of the host name of the server, and SAN names for any sites you plan to use this certificate for)
  7. Save the Request file.
  8. A) Navigate to your CA sign the certificate. (In my case I have web enrollment, so I simply navigated to my CA web page and picked custom request, then opened the request file in notepad and copied the request contents into the text box of the web request, after issued, saved a copy in Base64 format)
    OR
    B) Open the CA snap-in, Right click the CA -> All tasks -> Submit a new Request, Save the issued cert file.
  9. Right click the Personal store on the remote Certificates Snap-in again, select All Tasks -> Import.
  10. Your Certificate is ready for use on the Website binding section of IIS.

Second way:

  1. Creating an INF file to set the certificate properties

    [Version] 
    Signature="$Windows NT$"
    
    [NewRequest] 
    Subject = "CN=SERVER.CONTOSO.COM"   ; For a wildcard use "CN=*.CONTOSO.COM" for example 
    ; For an empty subject use the following line instead or remove the Subject line entierely 
    ; Subject = 
    Exportable = FALSE                  ; Private key is not exportable 
    KeyLength = 2048                    ; Common key sizes: 512, 1024, 2048, 4096, 8192, 16384 
    KeySpec = 1                         ; AT_KEYEXCHANGE 
    KeyUsage = 0xA0                     ; Digital Signature, Key Encipherment 
    MachineKeySet = True                ; The key belongs to the local computer account 
    ProviderName = "Microsoft RSA SChannel Cryptographic Provider" 
    ProviderType = 12 
    SMIME = FALSE 
    RequestType = CMC
    
    ; At least certreq.exe shipping with Windows Vista/Server 2008 is required to interpret the [Strings] and [Extensions] sections below
    
    [Strings] 
    szOID_SUBJECT_ALT_NAME2 = "2.5.29.17" 
    szOID_ENHANCED_KEY_USAGE = "2.5.29.37" 
    szOID_PKIX_KP_SERVER_AUTH = "1.3.6.1.5.5.7.3.1" 
    szOID_PKIX_KP_CLIENT_AUTH = "1.3.6.1.5.5.7.3.2"
    
    [Extensions] 
    %szOID_SUBJECT_ALT_NAME2% = "{text}dns=computer1.contoso.com&dns=computer2.contoso.com" 
    %szOID_ENHANCED_KEY_USAGE% = "{text}%szOID_PKIX_KP_SERVER_AUTH%,%szOID_PKIX_KP_CLIENT_AUTH%"
    
    [RequestAttributes] 
    CertificateTemplate= WebServer
  2. Compiling the INF file into a REQ fileThe following command-line command will generate key material and turn the INF file into a certificate request.
    certreq –new ssl.inf ssl.req

    Once the certificate request was created you can verify the request with the following command:

    certutil ssl.req
  3. Submitting the REQ file to the CA: if the CA is reachable via RPC over the network, use the following command to submit the certificate request to the CA:
    certreq –submit ssl.req

    You will get a selection dialog to select the CA from. If the CA is configured to issue certificates based on the template settings, the CA may issue the certificate immediately.If RPC traffic is not allowed between the computer where the certificate request was created and the CA, transfer the certificate request to the CA and perform the above command locally at the CA.

    If the certificate template name was not specified in the certificate request above, you can specify it as part of the submission command:

    certreq -attrib "CertificateTemplate:webserver" –submit ssl.req
  4. Installing the certificate at the IIS or ISA computer: Once the certificate was issued and is available as a file on the target computer, use the following command to install it.
    certreq –accept ssl.cer

    The installation actually puts the certificate into the computer’s personal store, links it with the key material created in step #1 and builds the certificate property. The certificate property stores information such as the friendly name which is not part of a certificate.After performing steps 1 to 4 the certificate will show up in the IIS or ISA management interface and can be bound to a web site or a SSL listener.

*UPDATE* Powershell – I love PowerShell. If you’d like some more automated scripts to help with such a task. Please see this Blog Post by Adam Bertram in which he provides a link to his gitHub page with the required scripts.

Thanks Adam for this fine work. I might just make a pull request to make some changes/tweaks to the scripts. Amazing the neat little tricks I learn from reading other peoples code. 🙂

Manage IIS on Server Core remotely

I’ve started to mange server core installations more and more. I recently required to manage on that was utilize IIS. While I’m fairly used to IIS manager, I wasn’t exactly quite sure how remote management worked.

At first I thought it was a part of RSAT, nope, but fret not it is a feature of Windows, just not enabled by default.

As I expected there to be a bunch of configuration BS required figured I’d google how to do it instead of googling errors. 😀 I found this really nice right tot the point YouTube video. Luckily this made my life easy.

So on the Core server:

#Install the required service
Install-WindowsFeature -Name Web-Mgmt-Service

#enable IIS remote management
reg add HKLM\SOFTWARE\Microsoft\WebManagement\Server /v EnableRemoteManagement /t REG_DWORD /d 1

#Enable service at boot
Set-Service WMSVC -StartupType Automatic

#Enable Service
Start-Service WMSVC

On the Client Machine (Windows 7-10)

#Enable IIS management tools
Programs and Features -> Turn Windows Features on or off -> IIS -> (check off all items under Web Management Tools, you may not need them all but to be safe doesn’t hurt to add them)

#Open IIS Manager
Either through Server Manager -> manage -> IIS
Or Under the Star menu -> Admin Tools -> IIS Manager

*NOTE* Don’t bother adding the IIS manager Snap-in to an existing MMC session, I found it’s missing the top menu bar.

*NOTE 2* You also need to install IIS Manager for Remote Administration 1.2 (Cause you know this isn’t bundled with RSAT, cause… reasons)
Else you’ll be missing the connect to server option under the file menu.

*UPDATE* Grab it from here (good drive share) as MS for some reason has removed the source link in place of a 404.

*NOTE 3* You have to prepend the admin user name with the domain name, else the connection will failed stating unauthorized.

Thanks SSmith!