Quick V2V’s
Table of Contents
There are multiple ways to do a V2V depending on your migration/conversion.
See here, here and here for some source examples and more in depth reviews of alternative tools/products, or even V2P as unlikely as that maybe 😛
VMDK to VHDX
This one will be short n sweet.
V2V a VMDK to a VHDX
Get this.
DO this:
Import-Module ‘C:\Program Files\Microsoft Virtual Machine Converter\MvmcCmdlet.psd1’
ConvertTo-MvmcVirtualHardDisk -SourceLiteralPath (Drive):\VM-disk1.vmdk -VhdType DynamicHardDisk -VhdFormat vhdx -destination (Drive):\vm-disk1
This was nice, but after a good amount of time, I realized I don’t like using Hyper-V much…. so how do you convert back from VHDX to a VMDK?
VHDX to VMDK
I used Linux open source tool;
Using qemu-img in Linux
Ubuntu Linux is used in this example for running qemu-img.
First, install qemu-img from the online software repositories:
sudo apt-get install qemu-utils
*Note if using Ubuntu live you will need to enable the community (*Universe) repository (outside the scope of this post)
Go to the directory where virtual disk images are stored (in this example VHD and VHDX virtual disk files are stored in /media/user1/data/):
cd /media/user1/data/
Check the VHDX file
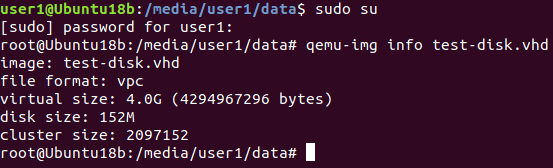
Get the root privileges (with the sudo su command) and view the VHD image information:
qemu-img info test-disk.vhd
Similarly, you can check the information about the VHDX virtual disk:
qemu-img info /media/user1/data/WinServer2016.vhdx

Convert VHD to VMDK in Linux
In order to convert VHD to VMDK with qemu-img in Linux, run the command as root:
qemu-img convert /media/user1/data/WinServer2016.vhdx -O vmdk /media/user1/data/WinServer2016qemu.vmdk -p
Where:
-O – define the output file format
-p – show the progress bar
Wait until the conversion process is finished.
Using qemu-img in Windows
Download qemu-img from the official web site (32-bit and 64-bit installers are available to download). In the current example, qemu-img-win-x64-2_3_0 is used. Extract files form the downloaded archive, for example, to C:\Programs\qemu-img\. Then launch the Windows command line (CMD) – Press Windows+R to open the “Run” box. Type “cmd” into the box and press Ctrl+Shift+Enter to run the command as an administrator.
Go to the qemu-img directory:
cd C:\Programs\qemu-img
Commands of qemu-img in Linux and Windows are identical.
Convert VHD to VMDK in Windows
Run CMD as administrator and go to the directory where qemu-img is installed.
View the virtual disk information:
qemu-img.exe info c:\Virtual\Hyper-V\test-disk.vhd
Convert the VHD disk image to the VMDK format:
qemu-img.exe convert -p c:\Virtual\Hyper-V\test-disk.vhd -O vmdk c:\Virtual\Hyper-V\test-disk.vmdk
Where:
-p – show progress
-O – the output file
Wait until the conversion process is finished.

Now the main thing to note is this conversion will be of a “type” that will only work with VMware Workstation… so if you need to mount this VMDK to a ESXi VM, you’ll need to “import it” basically convert it to the proper type… I’m usually a fan of VMware but this one is kind of lame.